Difference between revisions of "PasswordReset"
(Created page with "===Password Reset=== ==My admin account has been changed and I can not log in.== Use telnet and then input the following command: # cd /mnt/mtd/Config/ # rm -rf group # rm...") |
|||
| (24 intermediate revisions by 5 users not shown) | |||
| Line 1: | Line 1: | ||
| − | ===Password Reset=== | + | ==Password Reset on Local GUI== |
| − | == | + | |
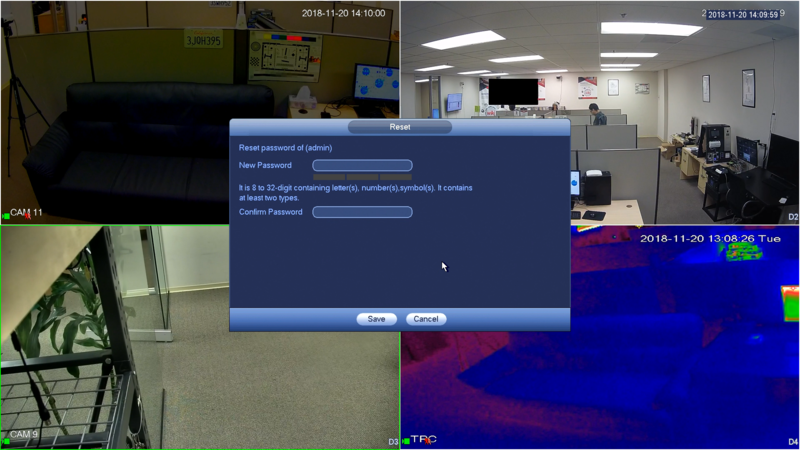
| − | + | ===Description=== | |
| − | + | This article is to show user how to do password reset from local GUI. | |
| − | + | ||
| − | + | ===Prerequisites=== | |
| − | + | 1. Dahua Recorder | |
| + | |||
| + | 2. Monitor that connected to Dahua Recorder | ||
| + | |||
| + | 3. Mouse to control local output | ||
| + | |||
| + | ===Step by step instruction=== | ||
| + | |||
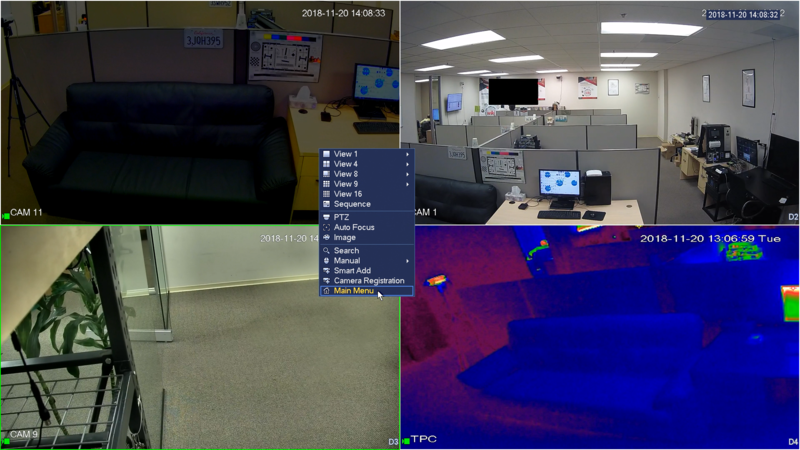
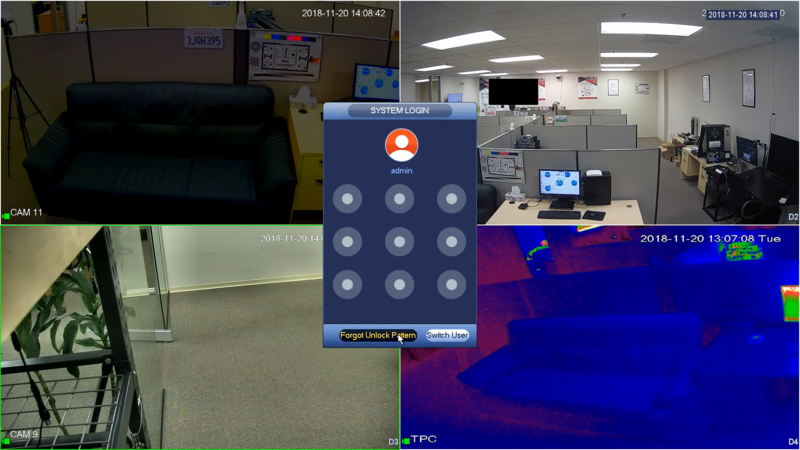
| + | 1. Right click from live view screen to locate the login screen of recorder. If you have pattern setup, Click on '''Forgot Unlock Pattern'''. | ||
| + | |||
| + | [[file:pri1.png|800px]] | ||
| + | |||
| + | [[file:pri2.png|800px]] | ||
| + | |||
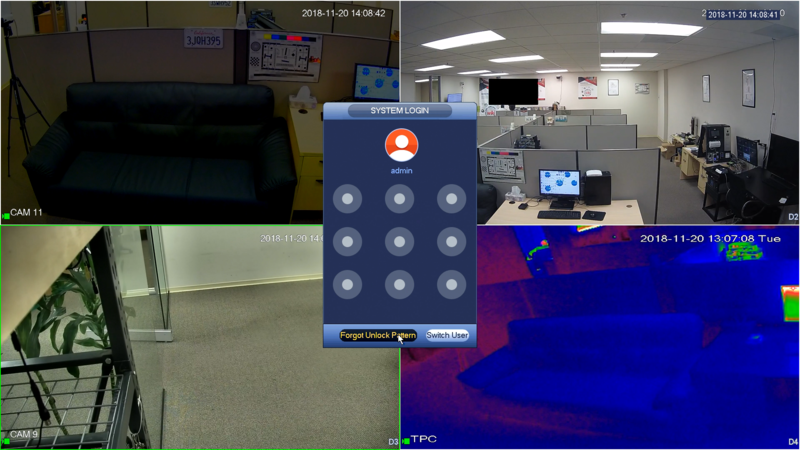
| + | 2. Click on '''Forget Password''' icon. | ||
| + | |||
| + | [[file:pri3.png|800px]] | ||
| + | |||
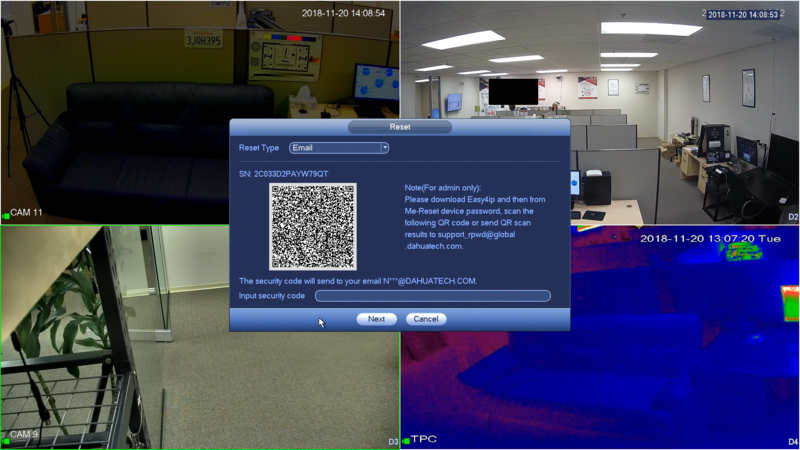
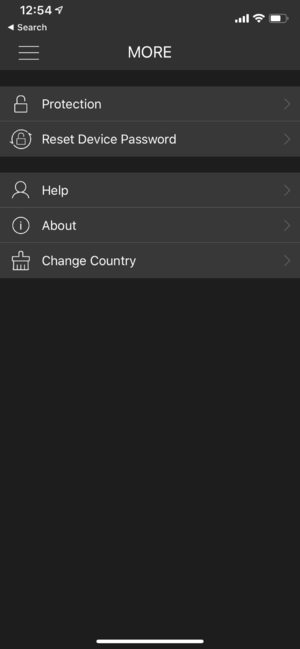
| + | 3. Using iDMSS or gDMSS app, Click '''More''' > '''Reset Device Password''' > Scan the QR code on the local recorder GUI. | ||
| + | |||
| + | [[file:pri4.png|800px]] | ||
| + | |||
| + | [[file:pri14.PNG|300px]] | ||
| + | |||
| + | [[file:pri15.PNG|300px]] | ||
| + | |||
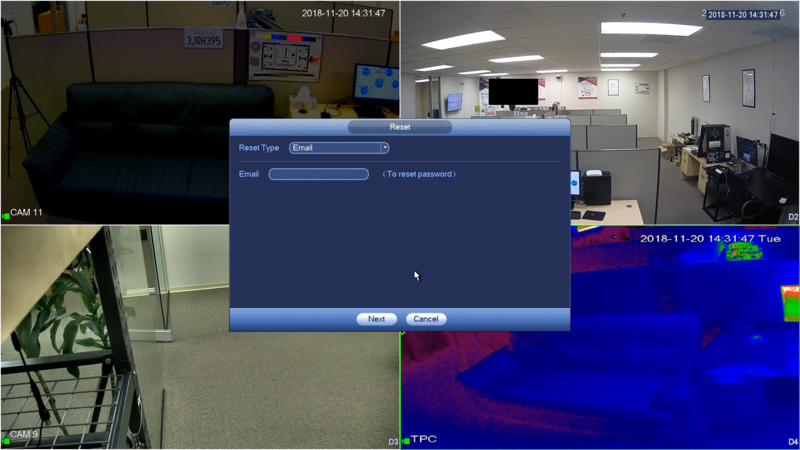
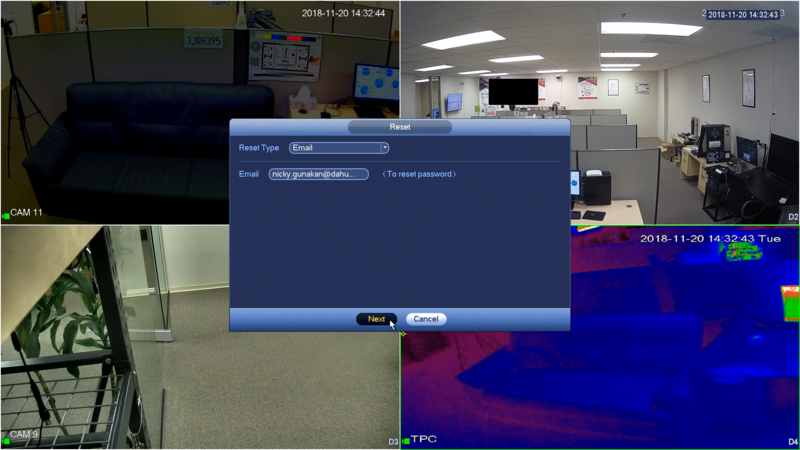
| + | NOTE: If user never register their email to the recorder at initial setup, user then will be prompted to enter their email address. | ||
| + | |||
| + | [[file:pti12.png|800px]] | ||
| + | |||
| + | [[file:pri13.png|800px]] | ||
| + | |||
| + | 4. You will receive notification '''Successfully Reset Password''', Click '''Ok'''. And then the security code will be sent to the email that registered on the recorder. | ||
| + | |||
| + | [[file:pri16.PNG|300px]] | ||
| + | |||
| + | 5. Locate the secure code in the email. | ||
| + | |||
| + | [[file:pri17.PNG|300px]] | ||
| + | |||
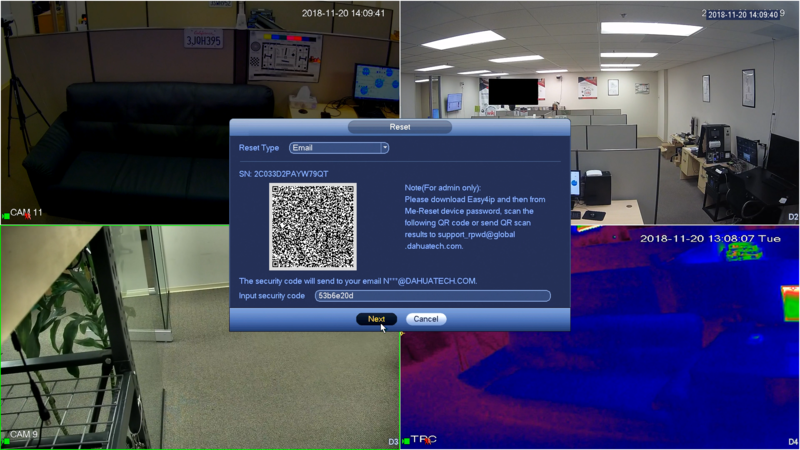
| + | 6. Enter the secure code. Click '''Next'''. | ||
| + | |||
| + | [[file:pri5.png|800px]] | ||
| + | |||
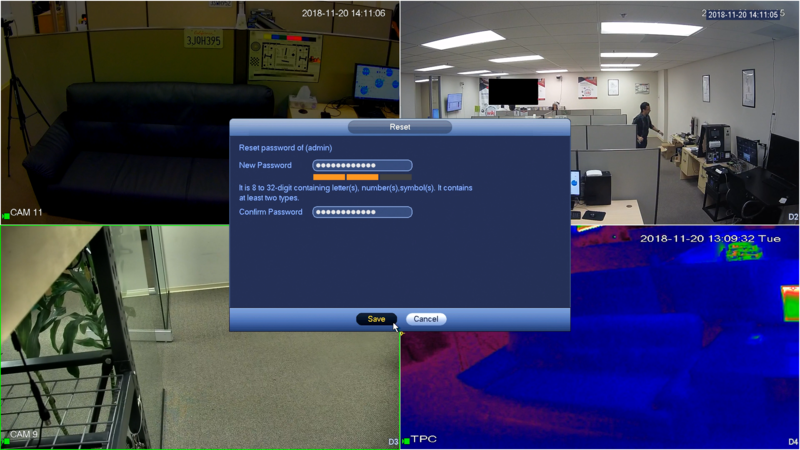
| + | 7. If the secure code is valid, the reset page will pop up, and then enter the new password for recorder and confirm. Click '''Save'''. | ||
| + | |||
| + | [[file:pri6.png|800px]] | ||
| + | |||
| + | [[file:pri7.png|800px]] | ||
| + | |||
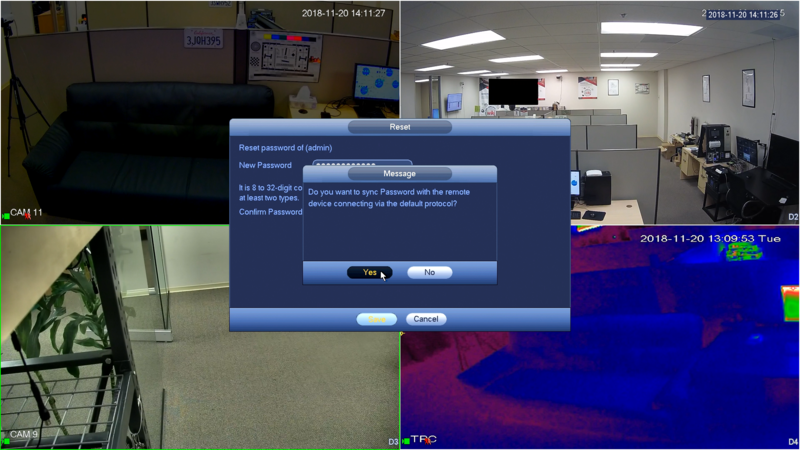
| + | 8. User will be prompt to sync the new password to the connected camera. It is highly recommended to click Yes to ensure camera will have the uniform password and stay connected to the recorder. | ||
| + | |||
| + | [[file:pri9.png|800px]] | ||
| + | |||
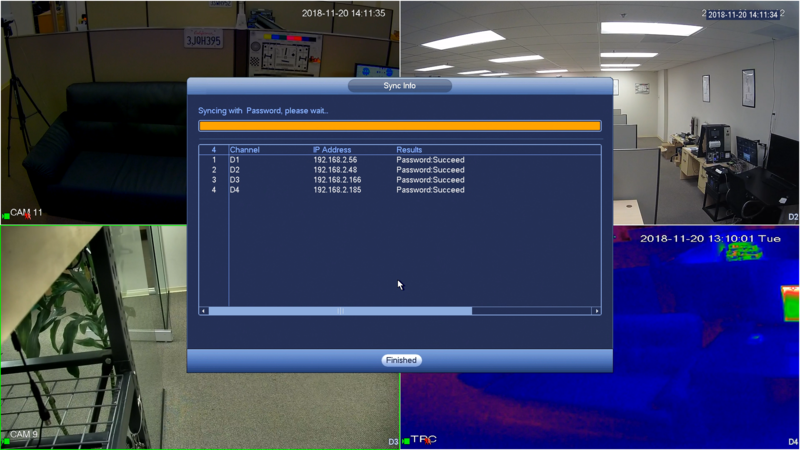
| + | 9. New recorder password will be sync with the connected cameras. | ||
| + | |||
| + | [[file:pri10.png|800px]] | ||
| + | |||
| + | 10. Click '''Finished''' when it's done. New password is now applied to the recorder and connected cameras. | ||
| + | |||
| + | [[file:pri11.png|800px]] | ||
| + | |||
| + | |||
| + | |||
| + | |||
| + | |||
| + | |||
| + | |||
| + | <!-- | ||
| + | |||
| + | Please contact your local service engineer or our sales person for help. We can guide you to solve this problem. | ||
| + | |||
| + | ==Initialization== | ||
| + | |||
| + | Step.1 After system booted up, default video display is the initialization interface, which couldn’t be canceled by right-clicking. See Figure 1-2 | ||
| + | |||
| + | [[File:resetinitial5.jpg|600x600px]] | ||
| + | |||
| + | |||
| + | ==Password Recovery after device initialization== | ||
| + | |||
| + | First of all, click “Forgot password” on the system login interface | ||
| + | |||
| + | |||
| + | |||
| + | |||
| + | |||
| + | |||
| + | |||
| + | |||
| + | Initialization and Password Reset of Dahua Devices | ||
| + | Introduction | ||
| + | |||
| + | |||
| + | |||
| + | |||
| + | |||
| + | |||
| + | |||
| + | |||
| + | |||
| + | Note: | ||
| + | If you want to experience the newest initialization function via old devices, you should restore default setup after upgrading. | ||
| + | (老设备升级新程序后,必须硬件恢复清除配置(恢复出厂设置),不然无法体验初始化功能。) | ||
| + | |||
| + | |||
| + | |||
| + | Table of Contents | ||
| + | 1. DVR/NVR 3 | ||
| + | 1.1. GUI 3 | ||
| + | 1.1.1. Initialization 3 | ||
| + | 1.1.2. Reset Password 4 | ||
| + | 1.2. Web 6 | ||
| + | 1.2.1. Initialization 6 | ||
| + | 1.2.2. Reset Password 6 | ||
| + | 1.3. SmartPSS 7 | ||
| + | 1.3.1. Initialization 7 | ||
| + | 1.3.2. Reset Password 9 | ||
| + | 1.4. Configtool 10 | ||
| + | 1.4.1. Initialization 10 | ||
| + | 1.4.2. Reset Password 12 | ||
| + | 1.5. Easy4IP 13 | ||
| + | 1.5.1. Initialization 13 | ||
| + | 1.5.2. Reset Password 14 | ||
| + | 2. Cameras 15 | ||
| + | 2.1. GUI of storage devices 15 | ||
| + | 2.1.1. Initialization 15 | ||
| + | 2.2. Web 16 | ||
| + | 2.3. SmartPSS 16 | ||
| + | 2.4. Configtool 16 | ||
| + | 2.5. Easy4IP 17 | ||
| + | |||
| + | |||
| + | |||
| + | |||
| + | |||
| + | |||
| + | |||
| + | 1. DVR/NVR | ||
| + | First of all, upgrade the firmware to the specific version, then restore default setup on the interface of “SETTING-SYSTEM-DEFAULT”: | ||
| + | Note: We take Dahua firmware for example here. | ||
| + | |||
| + | Figure 1-1 | ||
| + | 1.1. GUI | ||
| + | 1.1.1. Initialization | ||
| + | Step.1 After system booted up, default video display is the initialization interface, which couldn’t be canceled by right-clicking. See Figure 1-2 | ||
| + | |||
| + | Figure 1 2 | ||
| + | Step.2 Please input your password twice and set a prompt question. The new password must be 8 to 32 characters long, and include at least two types from letter(s), number(s) and symbol(s). | ||
| + | Note: Prompt question is a custom prompt message for helping customers remember password. | ||
| + | Step.3 Click next to set the pattern password. This step can be skipped. See Figure 1-3. | ||
| + | Note: | ||
| + | |||
| + | Figure 1-3 | ||
| + | Step.4 You can set the assigned email address and security questions here to reset the password in case you forgot. Boxes of email and security questions are checked by default, and could be skipped by unchecking the boxes. See Figure 1-4. | ||
| + | |||
| + | Figure 1-4 | ||
| + | Step.5 Click “save” to finish the device initialization. | ||
| + | Note: Pattern password, assigned email address and security question can be added or changed after initialization on “SETTING-SYSTEM-ACCOUNT” interface. | ||
| + | 1.1.2. Reset Password | ||
| + | Firs of all, click “Forgot password” on the system login interface. See Figure 1-5. | ||
| + | |||
| + | Figure 1-5 | ||
| + | Method 1. By security questions: | ||
| + | If you have set the security questions, you can reset the password by answering these questions. See Figure 1-6. | ||
| + | Note: Security questions are only valid on local GUI. | ||
| + | |||
| + | Figure 1-6 | ||
| + | Method 2. By scanning QR code and inputting security code got from service email. | ||
| + | Step.1 If you haven’t set the assigned email address before, you will have a chance to reset the email address. See Figure 1-7. If the assigned has been set, system will skip to Step.2. | ||
| + | |||
| + | Figure 1-7 | ||
| + | Step.2 Download Dahua APP (EASY4IP, DMSS) to scan the QR code from “Easy4ip”-“Me”-‘’Setting”-“Reset Password” to scan QR code, the security code will be sent to your assigned email. If you don’t have Dahua APP, please use other APP to scan the QR code and get code message, then send the code string to support_rpwd@global.dahuatech.com (just for Dahua devices) as an attachment. See Figure 1-8 | ||
| + | Note: The service email address of Dahua devices and General devices are different. | ||
| + | No matter you choose Dahua APP or email to send QR code, the security code will just be sent to the assigned email. | ||
| + | |||
| + | Figure 1-8 | ||
| + | Step.3 Click “Next”, and reset password. | ||
| + | |||
| + | 1.2. Web | ||
| + | 1.2.1. Initialization | ||
| + | Step.1 Come to the web interface, you will see initialization interface, which couldn’t be canceled or deleted. See Figure 1-9. | ||
| + | |||
| + | Figure 1-9 | ||
| + | Step.2 Please input your password twice and set a assigned email address. Assigned email address is an optional item. | ||
| + | Note: If there is no assigned email set before, it will be unable to reset password through web. | ||
| + | Step.3 Click “Save” to live view interface. | ||
| + | 1.2.2. Reset Password | ||
| + | Step.1 Click “Forgot password” on login interface. See Figure 1-10. | ||
| + | |||
| + | Figure 1-10 | ||
| + | Step.2 Download Dahua APP (EASY4IP, DMSS) to scan the QR code from “Easy4ip”-“Me”-‘’Reset Password” to scan QR code, the security code will be sent to your assigned email. If you don’t have Dahua APP, please use other APP to scan the QR code and get code message, and send the code string to support_rpwd@global.dahuatech.com (just for Dahua devices) as an attachment. See Figure 1-11. | ||
| + | Note: If there is no assigned email set before, you will see prompt message as Figure 1-12. | ||
| + | |||
| + | Figure 1-11 | ||
| + | |||
| + | Figure 1-12 | ||
| + | 1.3. SmartPSS | ||
| + | Version: | ||
| + | SmartPSS supports initialization in batch for DVR/NVR/IPC and password resetting in batch for IPC. | ||
| + | Note. SmartPSS couldn’t support password resetting in batch for DVR/NVR. | ||
| + | 1.3.1. Initialization | ||
| + | Step.1 Click “Auto Search”, you will see the device search interface as Figure 1-13. | ||
| + | |||
| + | Figure 1-13 | ||
| + | Step.2 Choose the uninitialized device(s) and click “Initialization”. See Figure 1-14. | ||
| + | |||
| + | Figure 1-14 | ||
| + | Step.3 You will see an initialization interface. Input the password of admin user twice on this interface. See Figure 1-15. | ||
| + | |||
| + | Figure 1-14 | ||
| + | Step.4 Click “Next” to set the assigned email address, which could be skipped. See Figure 1-15. | ||
| + | |||
| + | Figure 1-14 | ||
| + | Step.5 Click “Next” to modify IP address of device(s). And this step could be skipped. See Figure 1-15. | ||
| + | |||
| + | Figure 1-15 | ||
| + | Step.6 After initializing, client will prompt success message. See Figure 1-16. | ||
| + | |||
| + | Figure 1-15 | ||
| + | 1.3.2. Reset Password | ||
| + | Click “Reset” on interface as Figure 1-16 or click “Reset Password” on interface as Figure 1-17. | ||
| + | |||
| + | Figure 1-16 | ||
| + | |||
| + | Figure 1-17 | ||
| + | There are two methods to reset password: 1. Email; 2. XML files; | ||
| + | Method 1. By scanning QR code and inputting security code got from service email. (Refer to Chapter 1.1.2 password resetting via GUI) | ||
| + | |||
| + | Figure 1-17 | ||
| + | Method 2. XML files (supports password resetting in batch) : | ||
| + | Step.1 Choose reset type of file. | ||
| + | Step.2 Set the export path and click “Export” to get an .xml file. | ||
| + | Step.3 Send the xml file to support_rpwd@global.dahuatech.com (just for Dahua devices) as an attachment. | ||
| + | Step.4 Import encrypted xml file sent by service email address. The encrypted xml file will be named “result”. | ||
| + | |||
| + | Figure 1-18 | ||
| + | |||
| + | 1.4. Configtool | ||
| + | Version: | ||
| + | Configtool supports initialization in batch for DVR/NVR/IPC and password resetting in batch for IPC. | ||
| + | Note. SmartPSS couldn’t support password resetting in batch for DVR/NVR. | ||
| + | 1.4.1. Initialization | ||
| + | Step.1 Click “Fresh”, an initializing interface will pop up. See Figure 1-19. | ||
| + | |||
| + | Figure 1-19 | ||
| + | Step.2 Choose the devices(s), click “Initialize”, and you will see the initializing interface as Figure 1-20. | ||
| + | |||
| + | Figure 1-20 | ||
| + | Step.3 Input your password twice and set an assigned email address to initialize the device(s). A success message will prompt. See Figure 1-21. | ||
| + | |||
| + | Figure 1-21 | ||
| + | 1.4.2. Reset Password | ||
| + | Click “FindPassword” on the interface of “System Settings-Password”. See Figure 1-22. | ||
| + | |||
| + | Figure 1-22 | ||
| + | There are two methods to reset password: 1. Email; 2. XML files; | ||
| + | Method 1. By scanning QR code and inputting security code got from service email. See Figure 1-23. (Refer to Chapter 1.1.2 password resetting via GUI) | ||
| + | |||
| + | Figure 1-23 | ||
| + | Method 2. XML files (supports password resetting in batch) : | ||
| + | Step.1 Choose reset type of XML File. | ||
| + | Step.2 Set the export path and click “Next” to get an xml file. | ||
| + | Step.3 Send the xml file to support_rpwd@global.dahuatech.com (just for Dahua devices) as an attachment. | ||
| + | Step.4 Import encrypted xml file sent by service email address. The encrypted xml file will be named “result”. | ||
| + | |||
| + | Figure 1-24 | ||
| + | |||
| + | Figure 1-25 | ||
| + | |||
| + | 1.5. Easy4IP | ||
| + | 1.5.1. Initialization | ||
| + | Step.1 Scanning device QR code to add the device, if it’s an uninitialized device, you will see interface as Figure 1-26. | ||
| + | |||
| + | Figure 1-26 | ||
| + | Step.2 Input password twice and set an assigned email, click “OK” to the next step. (Setting of assigned email is optional.) | ||
| + | Step.3 Set the time zone of device, click “Start Preview” to finish initialization. | ||
| + | |||
| + | Figure 1-27 | ||
| + | 1.5.2. Reset Password | ||
| + | Interface is under development. | ||
| + | |||
| + | 2. Cameras | ||
| + | First of all, upgrade the firmware to the specific versions below, then restore default setup by holding the reset button on device for 10 seconds or clicking “Default” button on web interface: | ||
| + | Note: We take Dahua firmware for example here. | ||
| + | 2.1. GUI of storage devices (IPC/HDCVI/PTZ) | ||
| + | Local GUI of storage devices supports initialization in batch. | ||
| + | 2.1.1. Initialization | ||
| + | Step.1 Check “To be initialized” box on the interface of “SETTING-CAMERA-REGISTRATION-Registration”, you will see all the uninitialized devices. See Figure 2-1. | ||
| + | |||
| + | Figure 2 1 | ||
| + | Step.2 Click “Initialize”, the initializing interface will pop up as Figure 2-2. You can use password and email info of current device (storage device) by checking the box, or input new password and assigned email address by unchecking the box. | ||
| + | |||
| + | Figure 2 2 | ||
| + | Step.3 Click “Next” to set the IP address of camera. See Figure 2-3. | ||
| + | |||
| + | Figure 2 3 | ||
| + | 2.2. Web(IPC/IP PTZ) | ||
| + | Refer to Chapter 1.2. | ||
| + | 2.3. SmartPSS(IPC/IP PTZ) | ||
| + | Refer to Chapter 1.3. | ||
| + | 2.4. Configtool(IPC/IP PTZ) | ||
| + | Refer to Chapter 1.4. | ||
| + | 2.5. Easy4IP(IPC/IP PTZ) | ||
| + | Refer to Chapter 1.5. | ||
| + | |||
| + | --> | ||
| + | |||
| + | [[Category:Troubleshoot]] | ||
| + | [[Category:FAQ]] | ||
| + | [[Category:How To]] | ||
| + | [[Category:NVR Interface]] | ||
| + | [[Category:Password Reset]] | ||
Latest revision as of 19:31, 2 August 2019
Contents
Password Reset on Local GUI
Description
This article is to show user how to do password reset from local GUI.
Prerequisites
1. Dahua Recorder
2. Monitor that connected to Dahua Recorder
3. Mouse to control local output
Step by step instruction
1. Right click from live view screen to locate the login screen of recorder. If you have pattern setup, Click on Forgot Unlock Pattern.
2. Click on Forget Password icon.
3. Using iDMSS or gDMSS app, Click More > Reset Device Password > Scan the QR code on the local recorder GUI.
NOTE: If user never register their email to the recorder at initial setup, user then will be prompted to enter their email address.
4. You will receive notification Successfully Reset Password, Click Ok. And then the security code will be sent to the email that registered on the recorder.
5. Locate the secure code in the email.
6. Enter the secure code. Click Next.
7. If the secure code is valid, the reset page will pop up, and then enter the new password for recorder and confirm. Click Save.
8. User will be prompt to sync the new password to the connected camera. It is highly recommended to click Yes to ensure camera will have the uniform password and stay connected to the recorder.
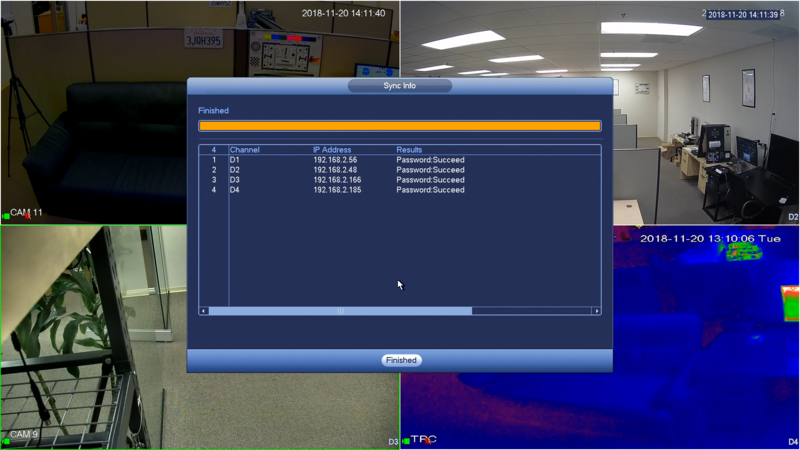
9. New recorder password will be sync with the connected cameras.
10. Click Finished when it's done. New password is now applied to the recorder and connected cameras.
