Difference between revisions of "NVR/Recording Setup/Audio Recording Setup"
(Created page with "==Setup Audio Recording== Note: These instructions only apply to systems capable of recording audio. You will need a power microphone and power speaker for the best results....") |
(→Step by Step Instructions) |
||
| (10 intermediate revisions by 5 users not shown) | |||
| Line 1: | Line 1: | ||
| + | |||
==Setup Audio Recording== | ==Setup Audio Recording== | ||
Note: These instructions only apply to systems capable of recording audio. You will need a power microphone and power speaker for the best results. | Note: These instructions only apply to systems capable of recording audio. You will need a power microphone and power speaker for the best results. | ||
| + | |||
| + | ===Description=== | ||
| + | Record Audio in addition to video. | ||
| + | |||
| + | ===Prerequisites=== | ||
| + | * Camera with internal Microphone or RCA audio input, or DVR with RCA audio inputs | ||
| + | * External powered RCA Microphone | ||
| + | * NVR, DVR, or Camera with SD card | ||
| + | |||
| + | ===Video Instructions=== | ||
| + | <embedvideo service="youtube">https://youtu.be/XDykuRr8zzk</embedvideo> | ||
| + | |||
| + | ===Step by Step Instructions=== | ||
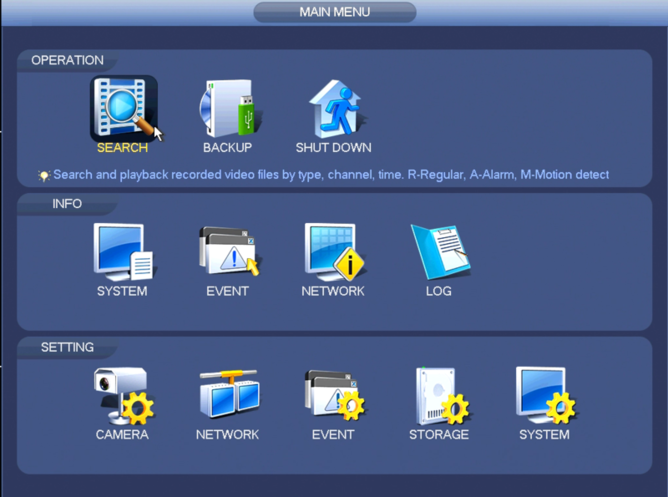
1. From the Main Menu, go to Setting->Camera->Encode | 1. From the Main Menu, go to Setting->Camera->Encode | ||
| − | [[ | + | [[File:IInterfaceMainMenu.png|668px]] |
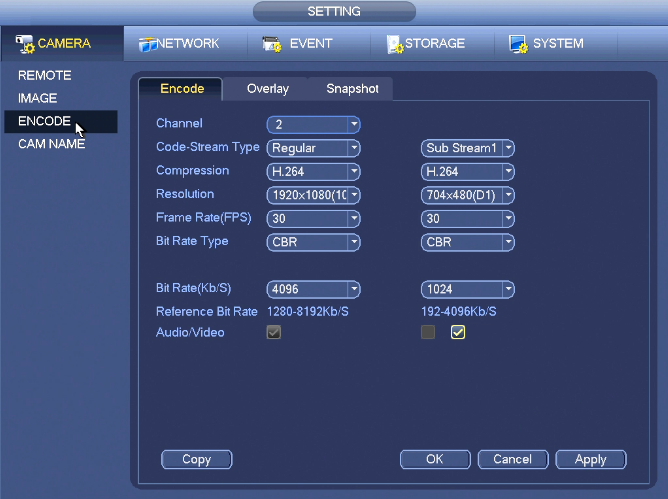
2. Click the box for, "Audio/Video" | 2. Click the box for, "Audio/Video" | ||
Latest revision as of 23:45, 2 November 2020
Contents
Setup Audio Recording
Note: These instructions only apply to systems capable of recording audio. You will need a power microphone and power speaker for the best results.
Description
Record Audio in addition to video.
Prerequisites
- Camera with internal Microphone or RCA audio input, or DVR with RCA audio inputs
- External powered RCA Microphone
- NVR, DVR, or Camera with SD card
Video Instructions
Step by Step Instructions
1. From the Main Menu, go to Setting->Camera->Encode
2. Click the box for, "Audio/Video"
3. Click, "Apply" and then, "OK"

