Difference between revisions of "Backup/Backup Snapshot"
(Created page with "==Backup Snapshot via USB== First of all, please enable the snapshot function. You can check with the following procedure. # Main Menu->setting->schedule, choose the channel...") |
(→Links) |
||
| (13 intermediate revisions by 3 users not shown) | |||
| Line 1: | Line 1: | ||
==Backup Snapshot via USB== | ==Backup Snapshot via USB== | ||
| + | ===Description=== | ||
| + | Backup snapshots on USB allows you to backup the snapshots for later use. | ||
| + | ===Prerequisites=== | ||
| + | *Flash drive or other backup device. | ||
| + | *NVR/HCVR with HDD | ||
| + | *Camera connected to recorder | ||
| + | ===Video Instructions=== | ||
| + | <embedvideo service="youtube">https://youtu.be/waBWi-irQGY</embedvideo> | ||
| + | ===Step by Step Instructions=== | ||
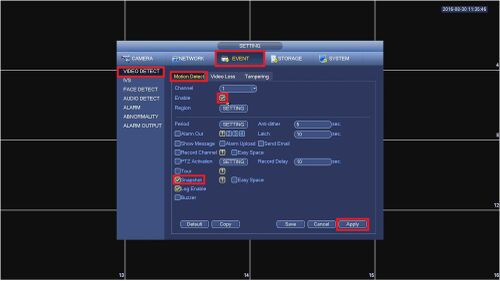
| + | 1. In order to get the system to save a snapshot we will setup motion detection. On the NVR go to the MAIN MENU->EVENT->VIDEO DETECT->Motion Detection and Enable motion detection, then the snapshot function, and hit Apply. | ||
| − | + | [[File:usbssbkup000.jpg|500x500px]] | |
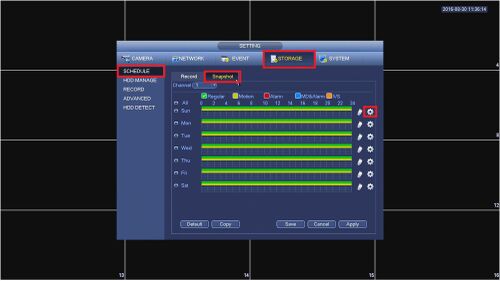
| − | + | 2. Now we will setup the terms of recording by going to MAIN MENU->STORAGE->SCHEDULE->Snapshot and selecting the gear icon. | |
| − | |||
| − | |||
| − | + | [[File:usbssbkup001.jpg|500x500px]] | |
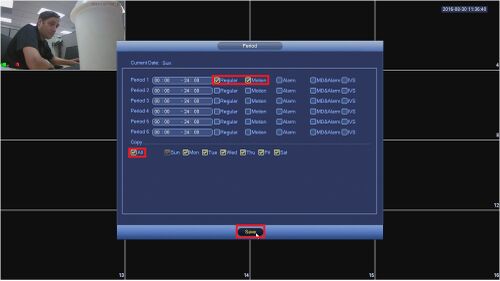
| − | + | Select Motion and copy to All days of the week in order to trigger a snapshot, then select Save. | |
| − | + | [[File:usbssbkup002.jpg|500x500px]] | |
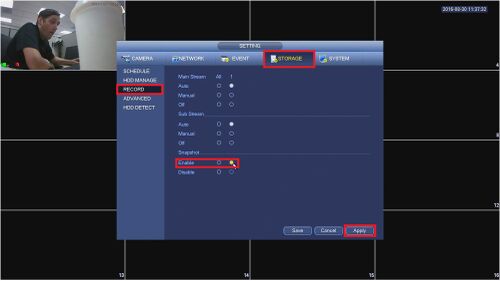
| − | [[ | + | 3. Ensure that you have enabled Snapshot Recording by going to MAIN MENU->STORAGE->RECORD and selecting Enable and then Apply. |
| + | |||
| + | [[File:usbssbkup003.jpg|500x500px]] | ||
| + | |||
| + | 4. Plug in your USB flash drive into the recorder, and select File Backup on the prompt OR go into the MAIN MENU->BACKUP | ||
| + | |||
| + | [[File:usbssbkup004.jpg|500x500px]] | ||
| + | |||
| + | [[File:usbssbkup005.jpg|500x500px]] | ||
| + | |||
| + | 5. Under the Type pull-down menu select PIC for pictures | ||
| + | |||
| + | [[File:usbssbkup006.jpg|500x500px]] | ||
| + | |||
| + | [[File:usbssbkup007.jpg|500x500px]] | ||
| + | |||
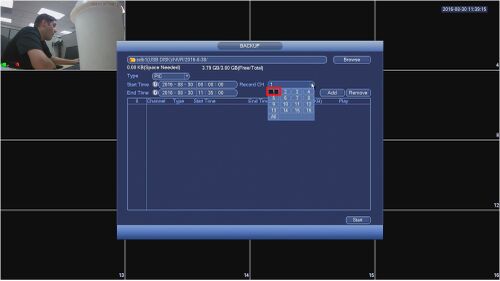
| + | 6. Under Record CH select the channel or all channels that you would like to find a screen shot on. | ||
| + | |||
| + | [[File:usbssbkup008.jpg|500x500px]] | ||
| + | |||
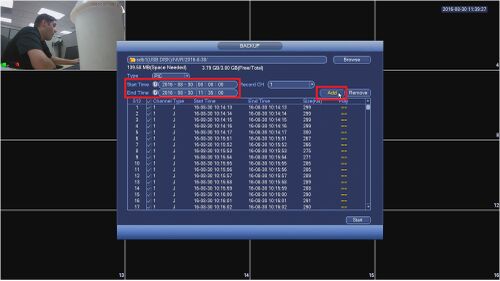
| + | 7. Define a time frame within 24 hours that you would like to search for the Snapshots and select Add | ||
| + | |||
| + | [[File:usbssbkup009.jpg|500x500px]] | ||
| + | |||
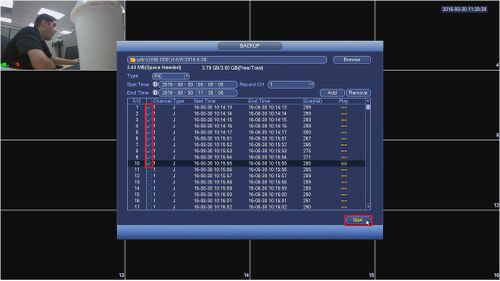
| + | 8. Once a list populates select the Snapshots that you would like to backup and select Start to begin the backup. | ||
| + | |||
| + | [[File:usbssbkup010.jpg|500x500px]] | ||
| + | |||
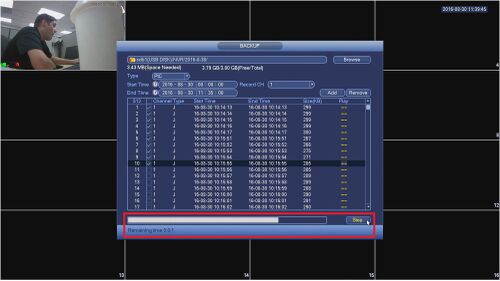
| + | 9. A progress bar at the bottom of the window will give you an estimate of when it will complete. You can cancel this operation by selecting Stop. | ||
| + | |||
| + | [[File:usbssbkup011.jpg|500x500px]] | ||
| + | |||
| + | |||
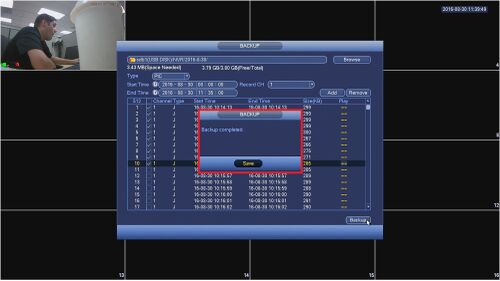
| + | 10. A prompt will appear on the screen once the process has finished, select okay and remove the USB flash drive with your backup. | ||
| + | |||
| + | [[File:usbssbkup012.jpg|500x500px]] | ||
| + | |||
| + | [[Category:Backup]] | ||
| + | [[Category:Record]] | ||
| + | [[Category:NVR]] | ||
Latest revision as of 20:33, 3 November 2020
Contents
Backup Snapshot via USB
Description
Backup snapshots on USB allows you to backup the snapshots for later use.
Prerequisites
- Flash drive or other backup device.
- NVR/HCVR with HDD
- Camera connected to recorder
Video Instructions
Step by Step Instructions
1. In order to get the system to save a snapshot we will setup motion detection. On the NVR go to the MAIN MENU->EVENT->VIDEO DETECT->Motion Detection and Enable motion detection, then the snapshot function, and hit Apply.
2. Now we will setup the terms of recording by going to MAIN MENU->STORAGE->SCHEDULE->Snapshot and selecting the gear icon.
Select Motion and copy to All days of the week in order to trigger a snapshot, then select Save.
3. Ensure that you have enabled Snapshot Recording by going to MAIN MENU->STORAGE->RECORD and selecting Enable and then Apply.
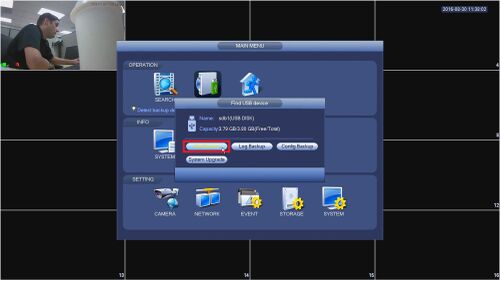
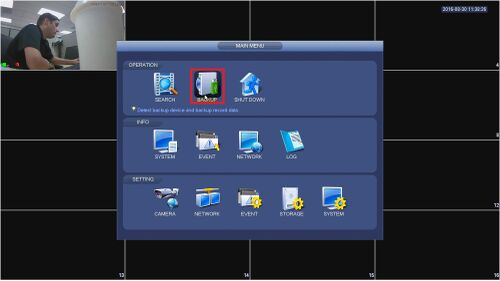
4. Plug in your USB flash drive into the recorder, and select File Backup on the prompt OR go into the MAIN MENU->BACKUP
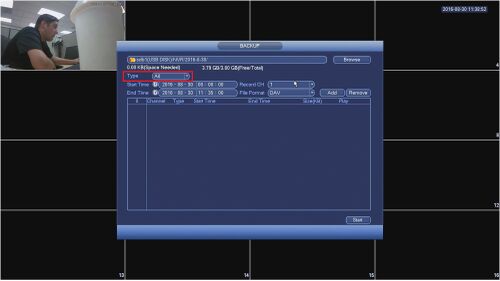
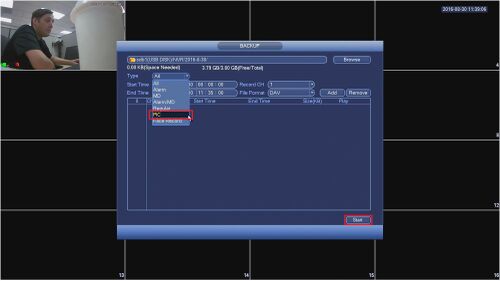
5. Under the Type pull-down menu select PIC for pictures
6. Under Record CH select the channel or all channels that you would like to find a screen shot on.
7. Define a time frame within 24 hours that you would like to search for the Snapshots and select Add
8. Once a list populates select the Snapshots that you would like to backup and select Start to begin the backup.
9. A progress bar at the bottom of the window will give you an estimate of when it will complete. You can cancel this operation by selecting Stop.
10. A prompt will appear on the screen once the process has finished, select okay and remove the USB flash drive with your backup.
