Difference between revisions of "Access Control/How To Setup ASR2100Z B Bluetooth Reader on DHI ASC3202B"
| Line 17: | Line 17: | ||
==Step by Step Instructions== | ==Step by Step Instructions== | ||
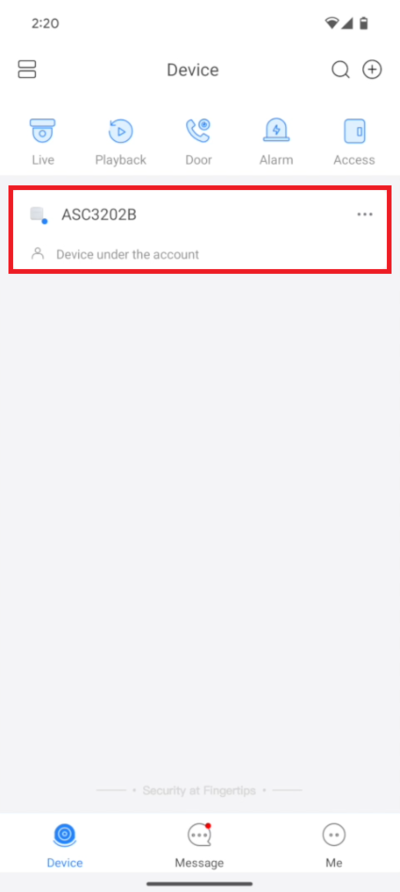
| − | 1. Open DMSS on mobile device that will manage the ASC3202B. | + | 1. Open DMSS on the mobile device that will manage the ASC3202B. |
Follow the steps in the "Adding ASC3202B to DMSS Mobile App" section of [https://dahuawiki.com/Access_Control/How_To_Setup_DHI_ASC3202B#Adding_ASC3202B_to_DMSS_Mobile_App This Guide] | Follow the steps in the "Adding ASC3202B to DMSS Mobile App" section of [https://dahuawiki.com/Access_Control/How_To_Setup_DHI_ASC3202B#Adding_ASC3202B_to_DMSS_Mobile_App This Guide] | ||
| − | [[File:ASR2100Z-BSetup1.png| | + | [[File:ASR2100Z-BSetup1.png|400px]] |
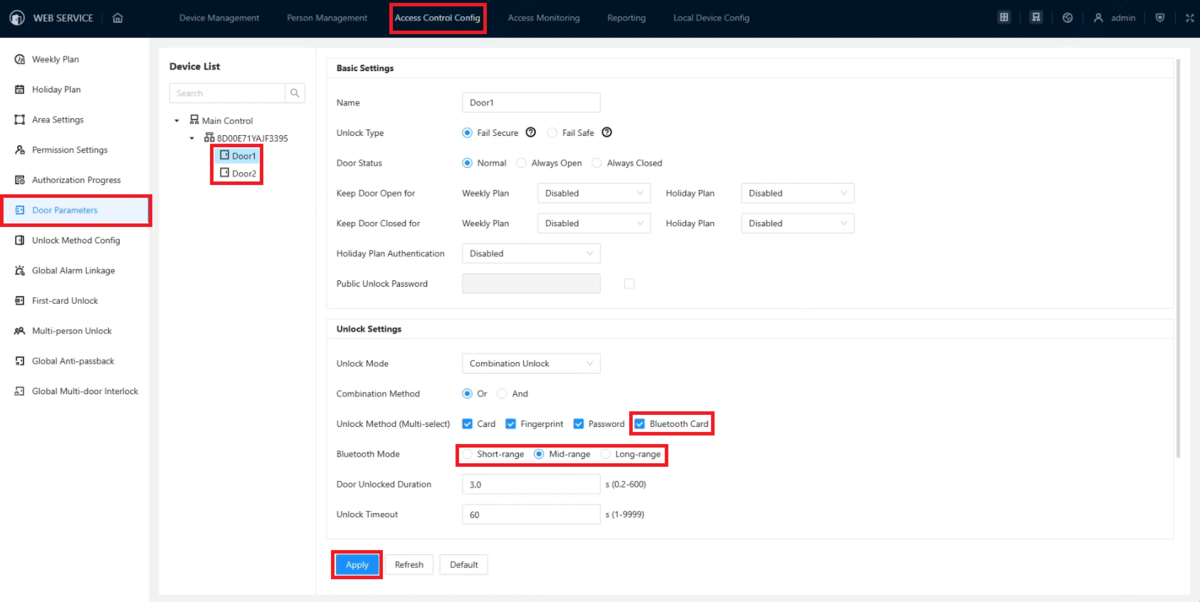
2. Open a web browser and log into the ASC3202B web interface. | 2. Open a web browser and log into the ASC3202B web interface. | ||
<br>Click on '''Access Control Config''' at the top. | <br>Click on '''Access Control Config''' at the top. | ||
| − | <br>Select '''Door | + | <br>Select '''Door Parameters''' on the left. |
| − | <br>Select the door that you have the ASR2100Z-B wired up to. | + | <br>Select the door that you have the ASR2100Z-B wired up to from the "Device List". |
<br>Make sure that '''Bluetooth Card''' is checked next to "Unlock Method (Multi-select)". | <br>Make sure that '''Bluetooth Card''' is checked next to "Unlock Method (Multi-select)". | ||
<br>Choose the range at which you want bluetooth to be able to unlock the door. '''Short-range''' for ≤ 0.2 m (0.66 ft), '''Mid-range''' for ≤ 2 m (6.56 ft), or '''Long-range''' for ≤ 10 m (32.81 ft). | <br>Choose the range at which you want bluetooth to be able to unlock the door. '''Short-range''' for ≤ 0.2 m (0.66 ft), '''Mid-range''' for ≤ 2 m (6.56 ft), or '''Long-range''' for ≤ 10 m (32.81 ft). | ||
<br>Then click '''Apply''' at the bottom | <br>Then click '''Apply''' at the bottom | ||
| − | [[File:ASR2100Z-BSetup2.png| | + | [[File:ASR2100Z-BSetup2.png|1200px]] |
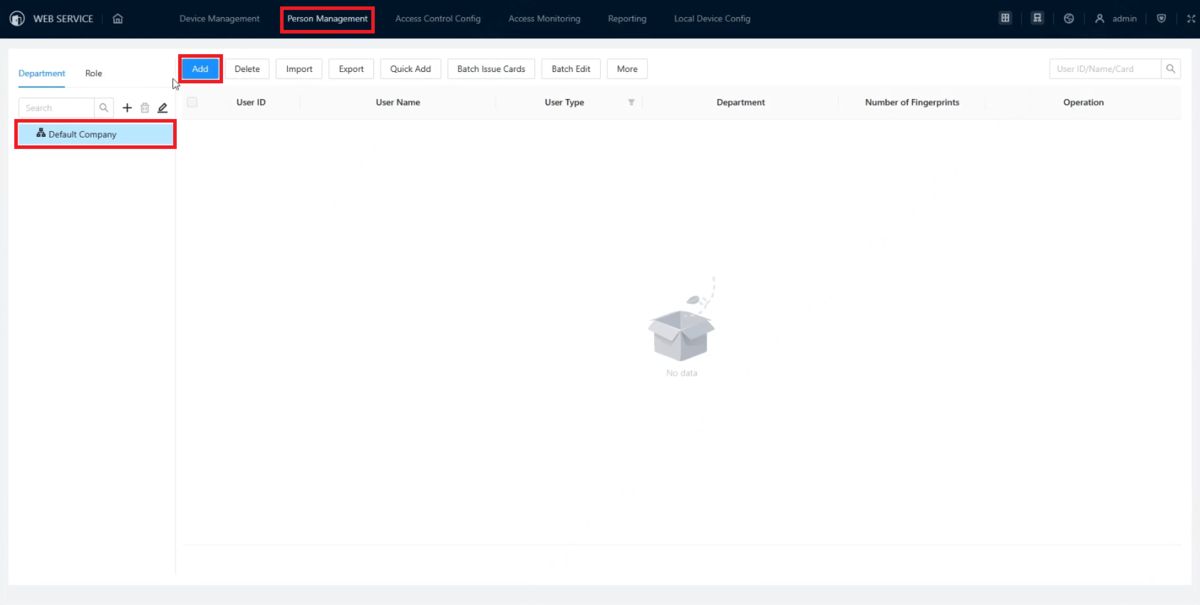
3. Click on '''Person Management''' at the top. | 3. Click on '''Person Management''' at the top. | ||
| Line 36: | Line 36: | ||
<br>Click on '''Add''' at the top | <br>Click on '''Add''' at the top | ||
| − | [[File:ASR2100Z-BSetup3.png| | + | [[File:ASR2100Z-BSetup3.png|1200px]] |
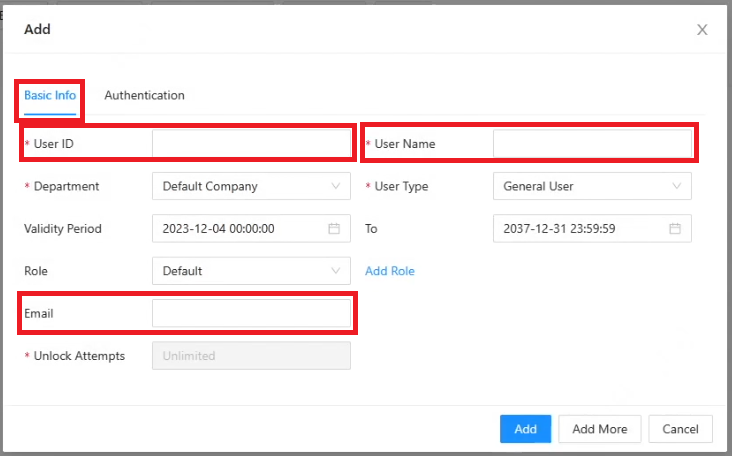
4. Select '''Basic Info''' at the top. | 4. Select '''Basic Info''' at the top. | ||
| Line 42: | Line 42: | ||
<br>Enter the user's name in the '''User Name''' field. | <br>Enter the user's name in the '''User Name''' field. | ||
<br>Enter an email address that has been registered in the DMSS mobile app in the '''Email''' field. | <br>Enter an email address that has been registered in the DMSS mobile app in the '''Email''' field. | ||
| − | <br>(If you have not already registered the email address as a DMSS mobile app user, follow [https://dahuawiki.com/DMSS/Create_Dahua_Account This Guide] | + | <br>(If you have not already registered the email address as a DMSS mobile app user, follow [https://dahuawiki.com/DMSS/Create_Dahua_Account This Guide]) |
[[File:ASR2100Z-BSetup4.png|800px]] | [[File:ASR2100Z-BSetup4.png|800px]] | ||
| Line 59: | Line 59: | ||
7. You will see "Operation successful" at the top and the user you just added will appear in the list | 7. You will see "Operation successful" at the top and the user you just added will appear in the list | ||
| − | [[File:ASR2100Z-BSetup7.png| | + | [[File:ASR2100Z-BSetup7.png|1200px]] |
| − | 8. If you want to issue bluetooth cards to multiple at a time, create | + | 8. If you want to issue bluetooth cards to multiple users at a time, create more than one user and then select '''Batch Issue Cards''' at the top. |
<br>(If you want to continue setup for one user, skip to Step 11) | <br>(If you want to continue setup for one user, skip to Step 11) | ||
<br>Either select '''Issue Cards to Selected Users''' if you checked the boxes next to only specific users, or select '''Issue Cards to All Users''' if you want to issue cards to all users in the list | <br>Either select '''Issue Cards to Selected Users''' if you checked the boxes next to only specific users, or select '''Issue Cards to All Users''' if you want to issue cards to all users in the list | ||
| − | [[File:ASR2100Z-BSetup8.png| | + | [[File:ASR2100Z-BSetup8.png|1200px]] |
9. Select '''Bluetooth Card''' at the top. | 9. Select '''Bluetooth Card''' at the top. | ||
<br>Click on '''Request through Email''' at the bottom | <br>Click on '''Request through Email''' at the bottom | ||
| − | [[File:ASR2100Z-BSetup9.png| | + | [[File:ASR2100Z-BSetup9.png|700px]] |
10. It will indicate at the bottom how many users were successfully issued Bluetooth Cards and how many failed. | 10. It will indicate at the bottom how many users were successfully issued Bluetooth Cards and how many failed. | ||
| Line 76: | Line 76: | ||
<br>Click on the '''X''' at the top right | <br>Click on the '''X''' at the top right | ||
| − | [[File:ASR2100Z-BSetup10.png| | + | [[File:ASR2100Z-BSetup10.png|700px]] |
11. Click on '''Access Control Config''' at the top. | 11. Click on '''Access Control Config''' at the top. | ||
| − | <br>Select '''Area | + | <br>Select '''Area Settings''' on the left. |
<br>Click on the '''+''' button at the top to create a new Area. | <br>Click on the '''+''' button at the top to create a new Area. | ||
<br>Enter the name of the new Area in the field next to '''Area Name'''. | <br>Enter the name of the new Area in the field next to '''Area Name'''. | ||
| Line 85: | Line 85: | ||
<br>Click on '''Apply''' at the bottom | <br>Click on '''Apply''' at the bottom | ||
| − | [[File:ASR2100Z-BSetup11.png| | + | [[File:ASR2100Z-BSetup11.png|1200px]] |
12. Select '''Permission Settings''' on the left. | 12. Select '''Permission Settings''' on the left. | ||
| Line 92: | Line 92: | ||
<br>Click on the '''Add''' button in the "Person Info" section | <br>Click on the '''Add''' button in the "Person Info" section | ||
| − | [[File:ASR2100Z-BSetup12.png| | + | [[File:ASR2100Z-BSetup12.png|1200px]] |
13. Select either '''Dept''', '''Role''', or '''User''' to show the category of users. | 13. Select either '''Dept''', '''Role''', or '''User''' to show the category of users. | ||
| Line 102: | Line 102: | ||
14. Click on the '''Add''' button in the "Area Info" section on the right | 14. Click on the '''Add''' button in the "Area Info" section on the right | ||
| − | [[File:ASR2100Z-BSetup14.png| | + | [[File:ASR2100Z-BSetup14.png|1200px]] |
15. Check the box next to the Area you created in Step 11 | 15. Check the box next to the Area you created in Step 11 | ||
| Line 111: | Line 111: | ||
<br>Click '''Apply''' at the bottom | <br>Click '''Apply''' at the bottom | ||
| − | [[File:ASR2100Z-BSetup16.png| | + | [[File:ASR2100Z-BSetup16.png|1200px]] |
17. Open DMSS on the mobile device the user will be using. | 17. Open DMSS on the mobile device the user will be using. | ||
| Line 119: | Line 119: | ||
<br>Tap on the card to open it | <br>Tap on the card to open it | ||
| − | [[File:ASR2100Z-BSetup17.png| | + | [[File:ASR2100Z-BSetup17.png|400px]] |
18. While on this page, move the mobile device within range to unlock the door. | 18. While on this page, move the mobile device within range to unlock the door. | ||
| Line 126: | Line 126: | ||
<br>Tap on '''I know''' to close the message | <br>Tap on '''I know''' to close the message | ||
| − | [[File:ASR2100Z-BSetup18.png| | + | [[File:ASR2100Z-BSetup18.png|400px]] |
19. If you want, you can change the method by which the bluetooth card unlocks the door. | 19. If you want, you can change the method by which the bluetooth card unlocks the door. | ||
<br>To do so, first tap on the Gear icon at the top right. | <br>To do so, first tap on the Gear icon at the top right. | ||
| − | [[File:ASR2100Z-BSetup19.png| | + | [[File:ASR2100Z-BSetup19.png|400px]] |
20. Then tap on '''Shake to Unlock''' | 20. Then tap on '''Shake to Unlock''' | ||
| − | [[File:ASR2100Z-BSetup20.png| | + | [[File:ASR2100Z-BSetup20.png|400px]] |
21. Now when you want to unlock the door, move the mobile device within range and shake it to unlock the door. | 21. Now when you want to unlock the door, move the mobile device within range and shake it to unlock the door. | ||
| Line 141: | Line 141: | ||
<br>Tap on '''I know''' to dismiss this message | <br>Tap on '''I know''' to dismiss this message | ||
| − | [[File:ASR2100Z-BSetup21.png| | + | [[File:ASR2100Z-BSetup21.png|400px]] |
22. If you want, you can also rename the card. | 22. If you want, you can also rename the card. | ||
| Line 147: | Line 147: | ||
<br>Then tap on '''Rename''' | <br>Then tap on '''Rename''' | ||
| − | [[File:ASR2100Z-BSetup22.png| | + | [[File:ASR2100Z-BSetup22.png|400px]] |
23. Enter the name you want to change the card's name to in the field below '''Rename'''. | 23. Enter the name you want to change the card's name to in the field below '''Rename'''. | ||
<br>Then tap on '''OK''' | <br>Then tap on '''OK''' | ||
| − | [[File:ASR2100Z-BSetup23.png| | + | [[File:ASR2100Z-BSetup23.png|400px]] |
24. The new name you entered will appear on the card | 24. The new name you entered will appear on the card | ||
| − | [[File:ASR2100Z-BSetup24.png| | + | [[File:ASR2100Z-BSetup24.png|400px]] |
Revision as of 20:47, 12 December 2023
Contents
How To Setup ASR2100Z-B Bluetooth Reader on DHI-ASC3202B
Description
This article will cover how to setup a ASR2100Z-B Bluetooth Reader on a DHI-ASC3202B
Prerequisites
- DHI-ASC3202B
- ASR2100Z-Bwired via RS485 to the DHI-ASC3202B
- A Computer connected to the DHI-ASC3202B
- DMSS Mobile App
NOTE: To use the Bluetooth functionality of the ASR2100Z-B Bluetooth Reader it must be connected to the DHI-ASC3202B Access Controller, connected via RS485 and configured via the web interface of the Access Controller. When using the Bluetooth functionality of the reader, the access controller cannot be managed by SmartPSS Lite or DSS.
The ASR2100Z-B can be used as just a card reader (NO Bluetooth functionality) when wired via RS485 or Weigand on any Dahua Access Controller, managed by SmartPSS Lite, DSS, or stand alone.
Video Instructions
Step by Step Instructions
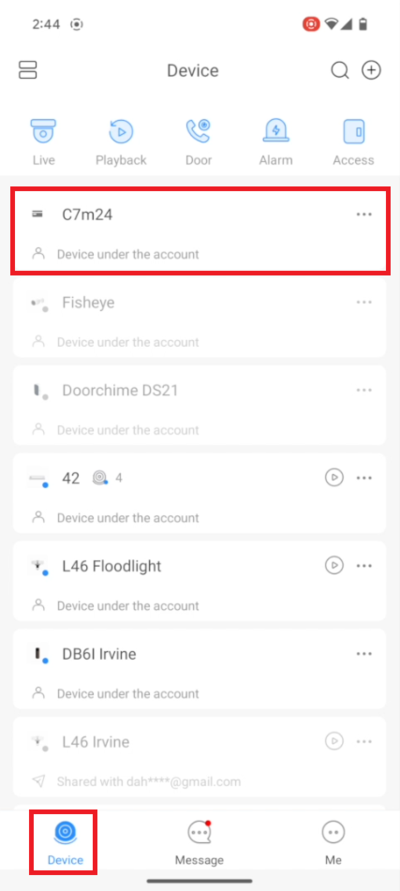
1. Open DMSS on the mobile device that will manage the ASC3202B. Follow the steps in the "Adding ASC3202B to DMSS Mobile App" section of This Guide
2. Open a web browser and log into the ASC3202B web interface.
Click on Access Control Config at the top.
Select Door Parameters on the left.
Select the door that you have the ASR2100Z-B wired up to from the "Device List".
Make sure that Bluetooth Card is checked next to "Unlock Method (Multi-select)".
Choose the range at which you want bluetooth to be able to unlock the door. Short-range for ≤ 0.2 m (0.66 ft), Mid-range for ≤ 2 m (6.56 ft), or Long-range for ≤ 10 m (32.81 ft).
Then click Apply at the bottom
3. Click on Person Management at the top.
Select the Department you want to add the user to on the left.
Click on Add at the top
4. Select Basic Info at the top.
Enter a unique ID in the User ID field.
Enter the user's name in the User Name field.
Enter an email address that has been registered in the DMSS mobile app in the Email field.
(If you have not already registered the email address as a DMSS mobile app user, follow This Guide)
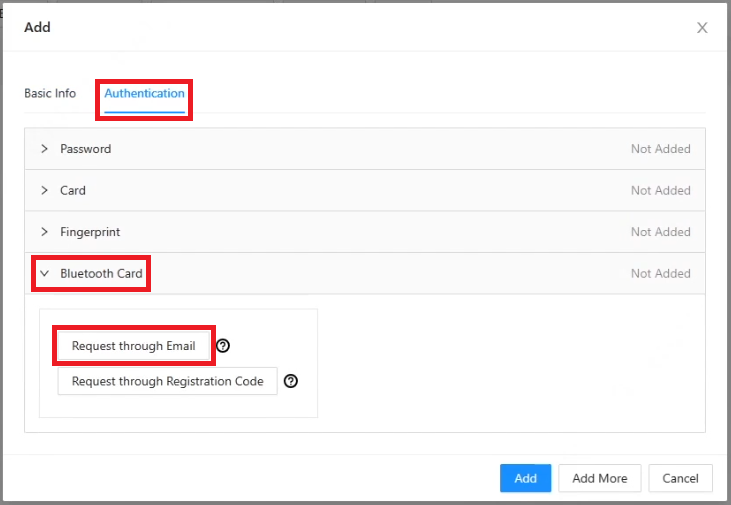
5. Select Authentication at the top.
Expand the Bluetooth Card section.
Click the Request through Email button
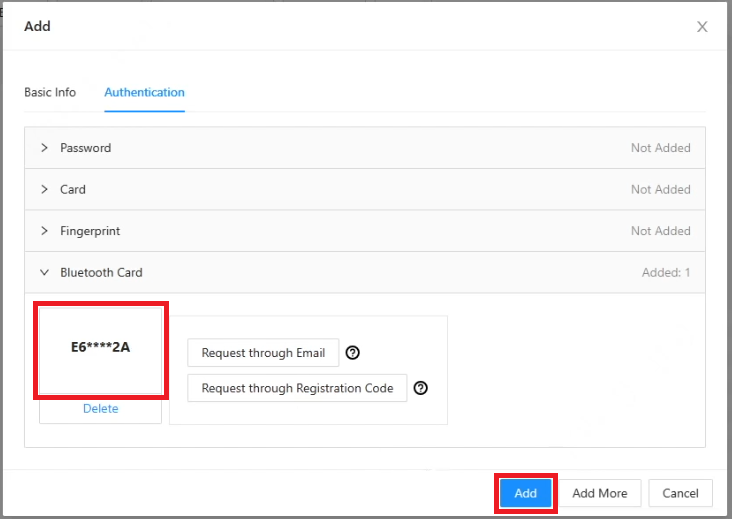
6. You will see a bluetooth card generated on the left.
Click Add at the bottom
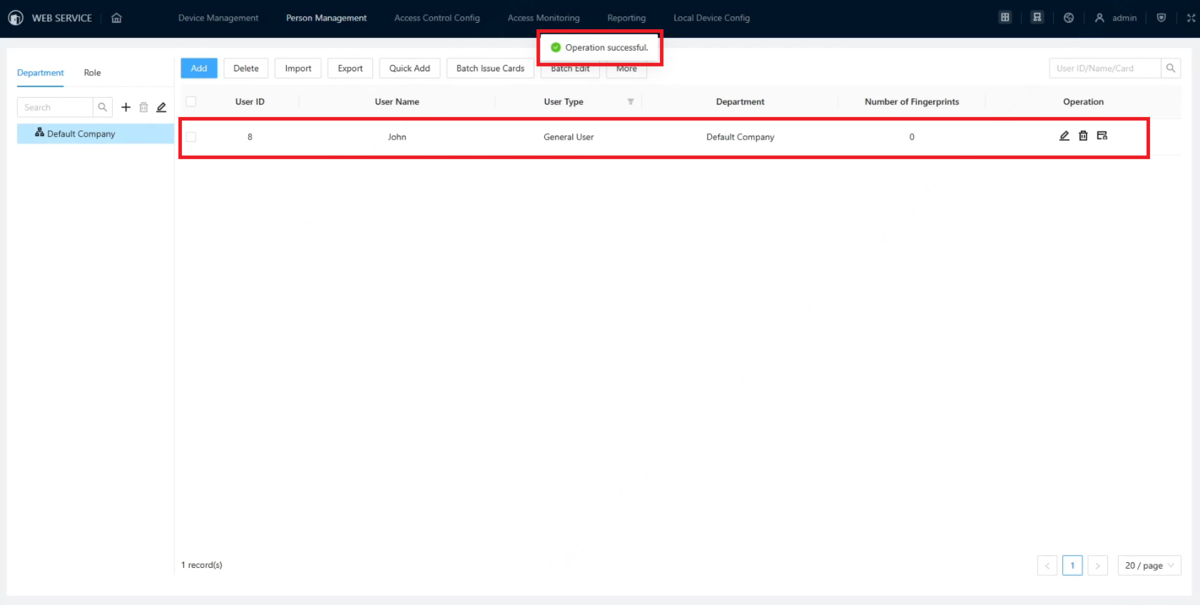
7. You will see "Operation successful" at the top and the user you just added will appear in the list
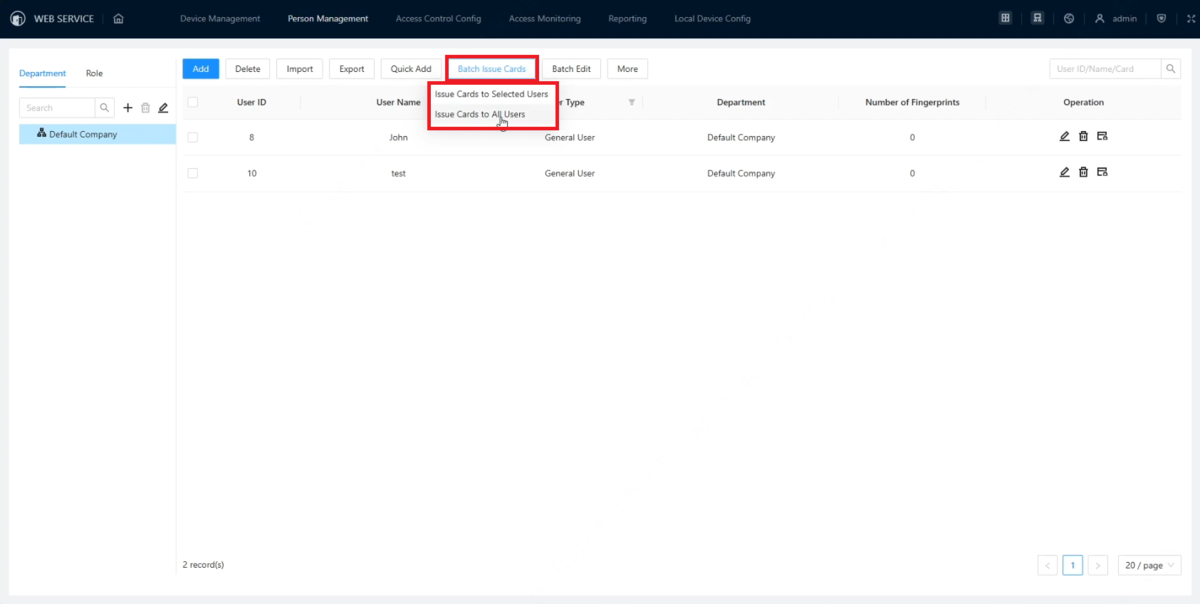
8. If you want to issue bluetooth cards to multiple users at a time, create more than one user and then select Batch Issue Cards at the top.
(If you want to continue setup for one user, skip to Step 11)
Either select Issue Cards to Selected Users if you checked the boxes next to only specific users, or select Issue Cards to All Users if you want to issue cards to all users in the list
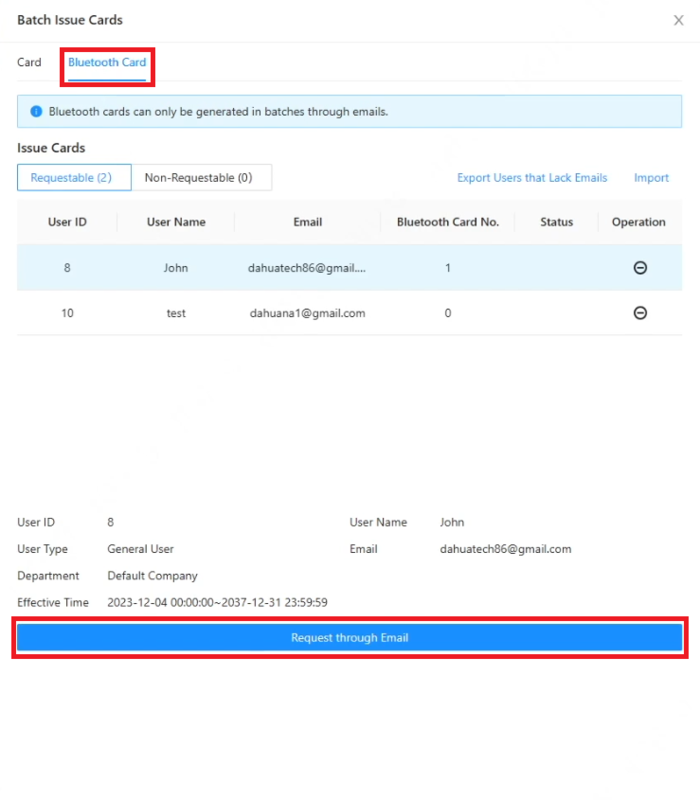
9. Select Bluetooth Card at the top.
Click on Request through Email at the bottom
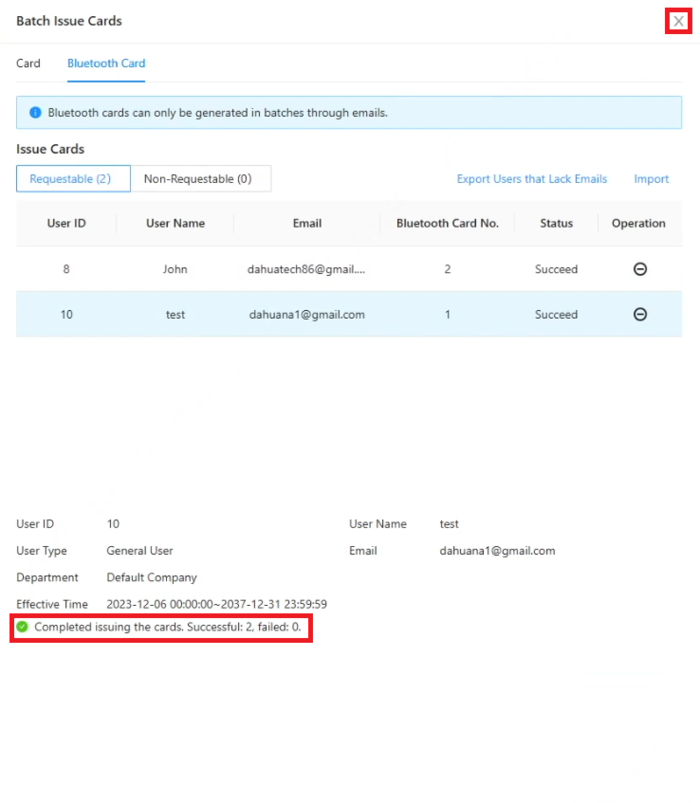
10. It will indicate at the bottom how many users were successfully issued Bluetooth Cards and how many failed.
For any that fail, verify that the user has an email address entered and that it has been used to create an active DMSS account.
Click on the X at the top right
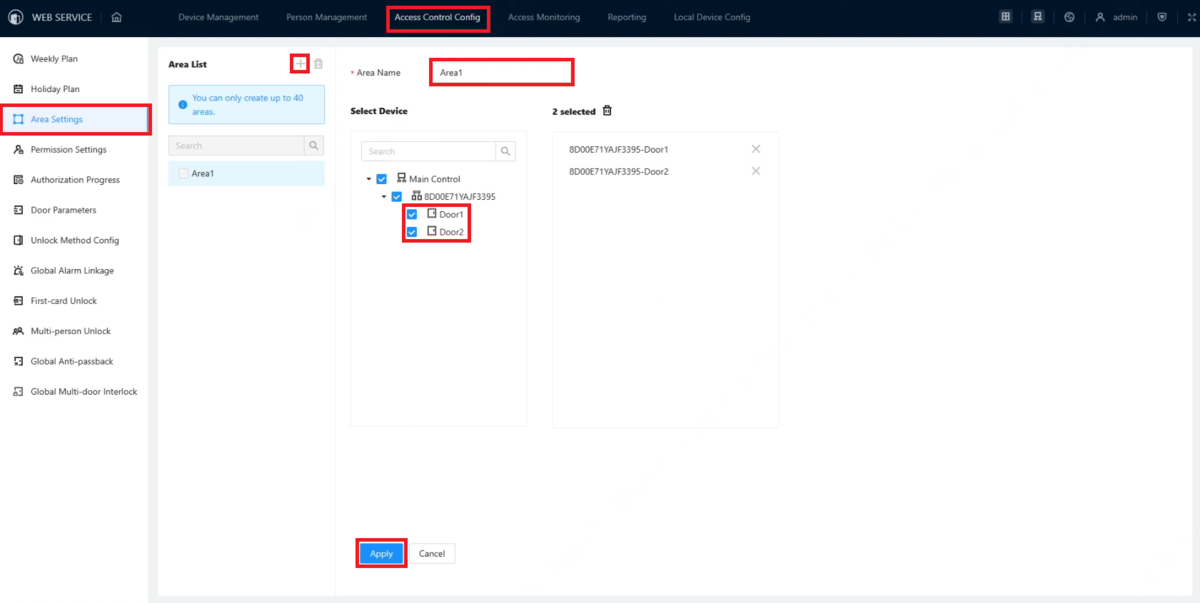
11. Click on Access Control Config at the top.
Select Area Settings on the left.
Click on the + button at the top to create a new Area.
Enter the name of the new Area in the field next to Area Name.
Check the box next to the door the Bluetooth Reader is wired to in the list.
Click on Apply at the bottom
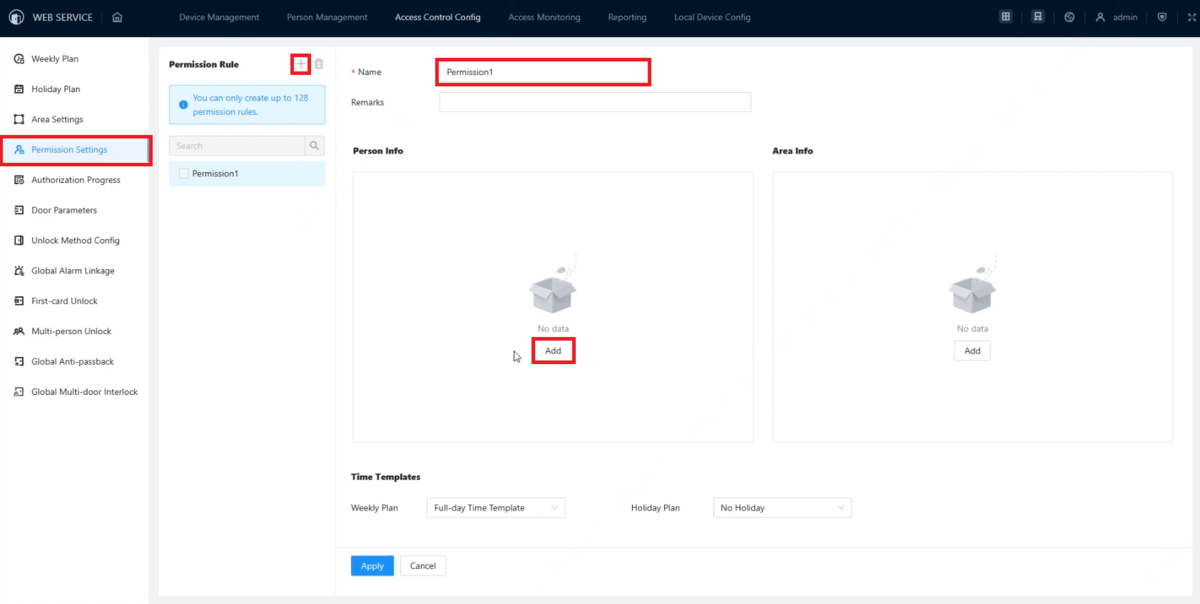
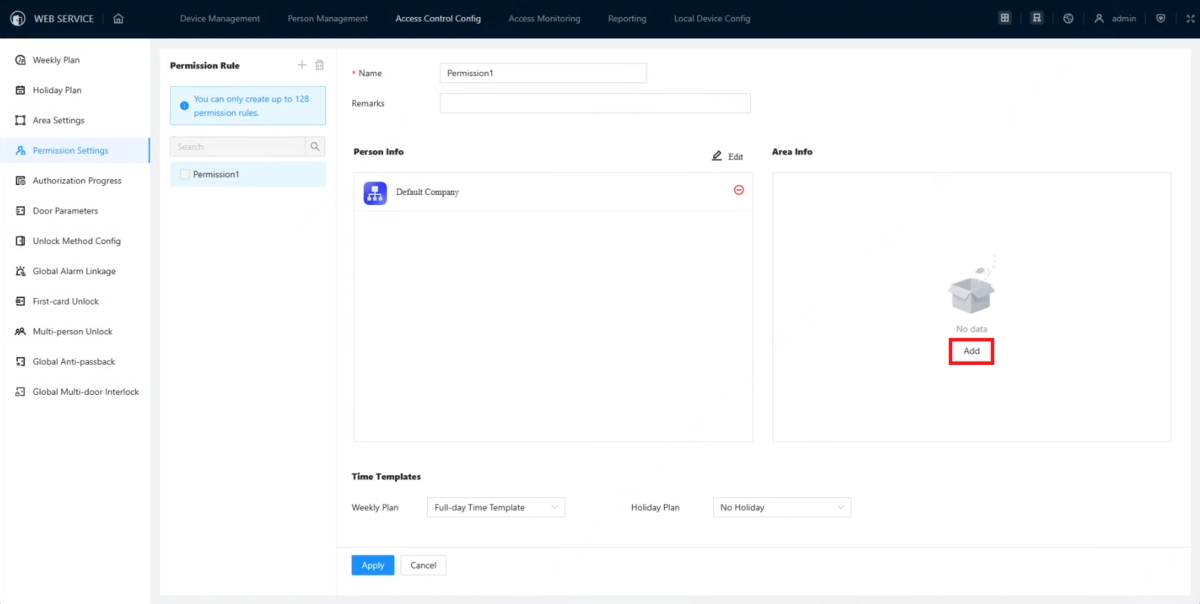
12. Select Permission Settings on the left.
Click on the + button at the top to create a new Permission Rule.
Enter the name of the new Permission Rule in the field next to Name.
Click on the Add button in the "Person Info" section
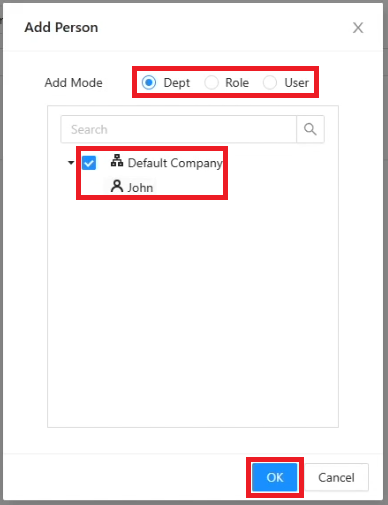
13. Select either Dept, Role, or User to show the category of users.
Then check the box next to the user(s) you want to give permission to.
Click OK at the bottom
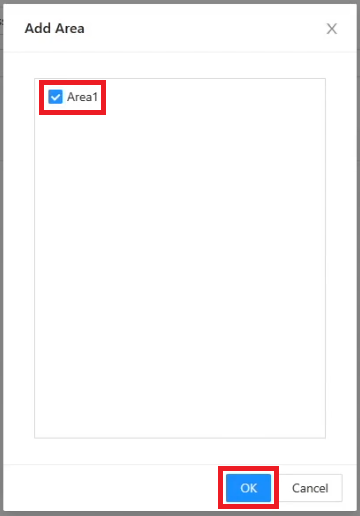
14. Click on the Add button in the "Area Info" section on the right
15. Check the box next to the Area you created in Step 11
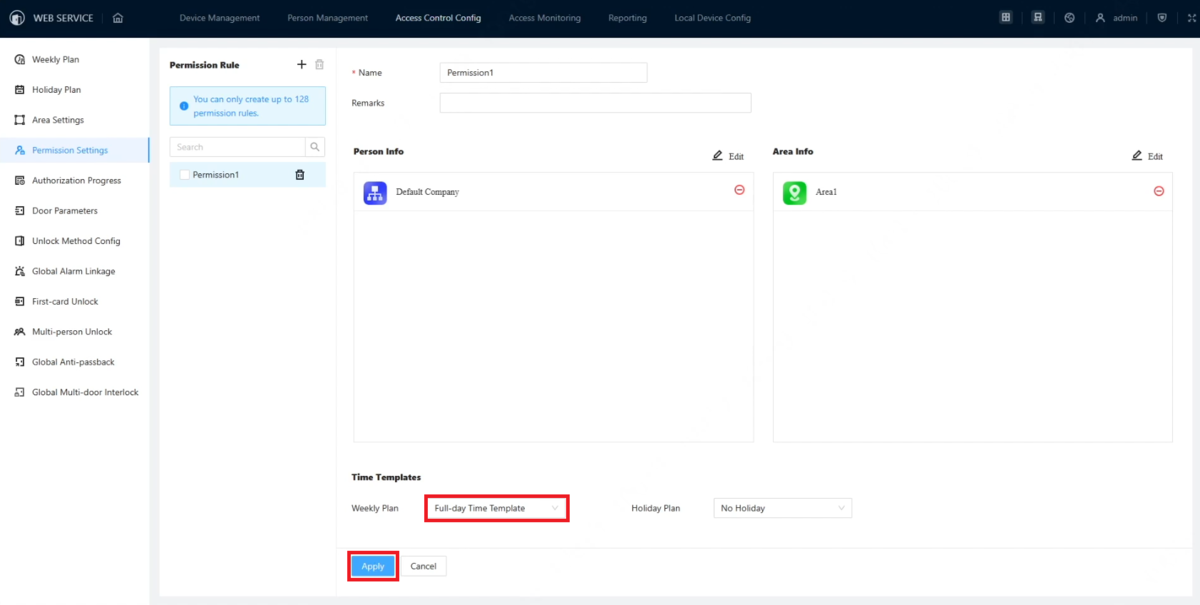
16. Select the schedule you want to use for access from the drop-down next to Weekly Plan.
Click Apply at the bottom
17. Open DMSS on the mobile device the user will be using.
Log into the DMSS account used to register the bluetooth card in Step 5.
Click on Device at the bottom.
You should see the Bluetooth Card in the list.
Tap on the card to open it
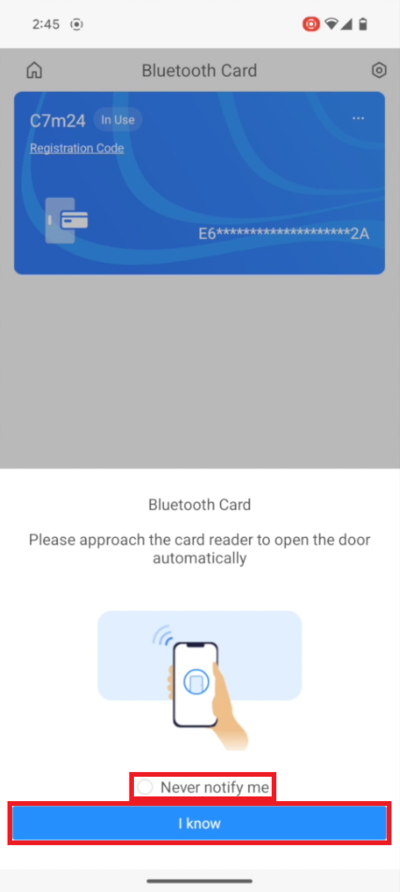
18. While on this page, move the mobile device within range to unlock the door.
A message will appear at the bottom to instruct you how to open the door.
You can stop that message from ever appearing again by checking the box for Never notify me.
Tap on I know to close the message
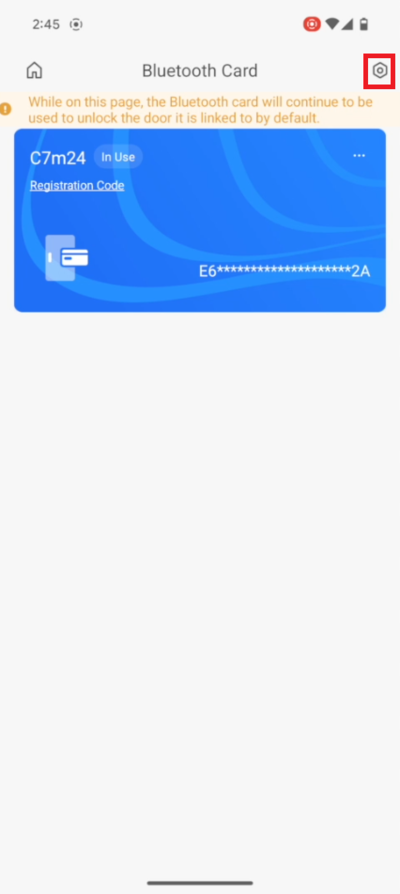
19. If you want, you can change the method by which the bluetooth card unlocks the door.
To do so, first tap on the Gear icon at the top right.
20. Then tap on Shake to Unlock
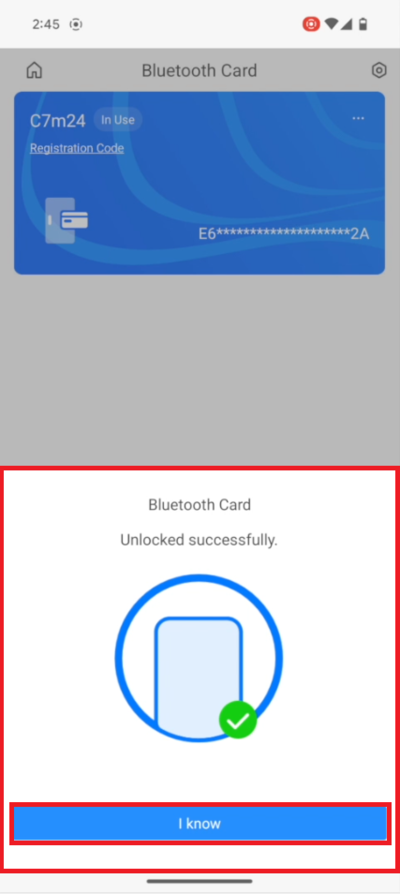
21. Now when you want to unlock the door, move the mobile device within range and shake it to unlock the door.
You will see a message at the bottom indicating when the door has been successfully unlocked.
Tap on I know to dismiss this message
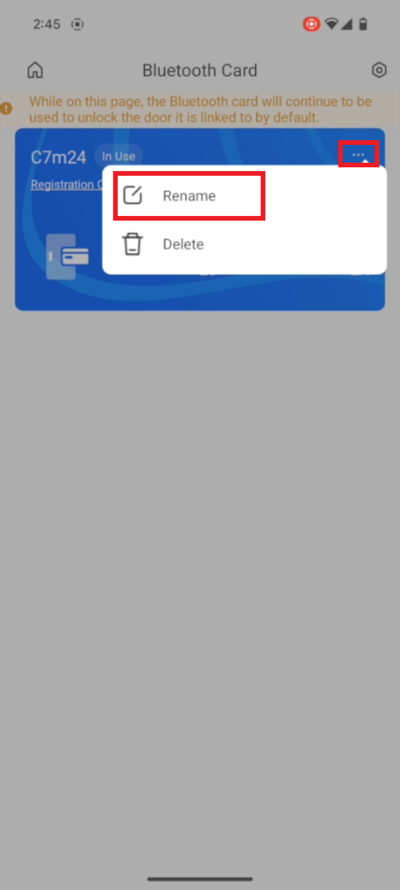
22. If you want, you can also rename the card.
To do so, first tap on the ... at the top right of the card.
Then tap on Rename
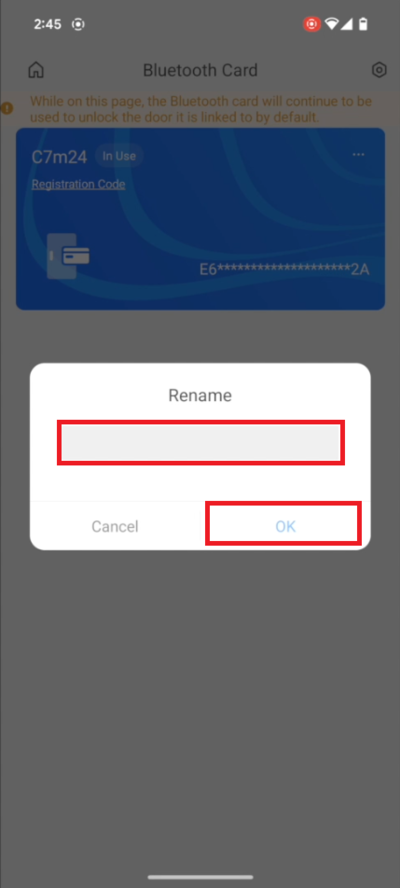
23. Enter the name you want to change the card's name to in the field below Rename.
Then tap on OK
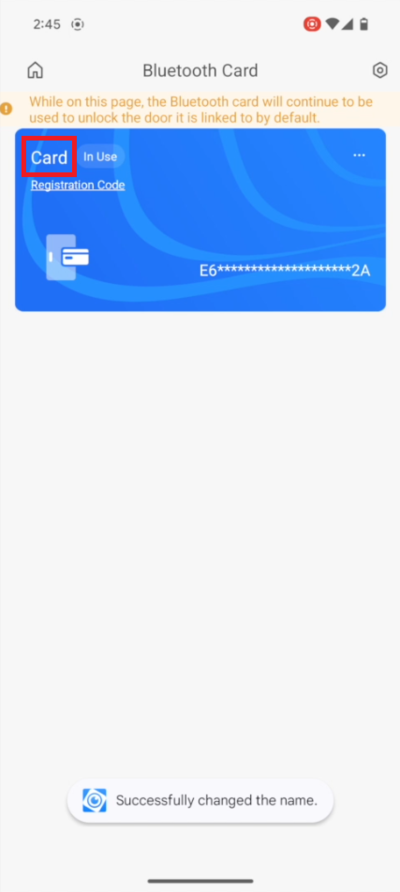
24. The new name you entered will appear on the card
