Difference between revisions of "DMSS/Share Device with Another User"
| (9 intermediate revisions by 2 users not shown) | |||
| Line 1: | Line 1: | ||
| − | =Share Device with Another User= | + | =Share a Device with Another User= |
==Description== | ==Description== | ||
| − | This article will show you how to share a Dahua device from one DMSS | + | This article will show you how to share a Dahua device from one DMSS account to another, using 2 different methods. It will also show how a user can provide a QR code so that an owner can easily share a device to them. |
==Prerequisites== | ==Prerequisites== | ||
| Line 7: | Line 7: | ||
*Dahua Device added to the Dahua Account | *Dahua Device added to the Dahua Account | ||
| − | + | There are 2 methods you can use to share a device in DMSS. Both methods provide the same result, but [[DMSS/Share_Device_with_Another_User#Method_1|Method 1]] is best for sharing a single device, while [[DMSS/Share_Device_with_Another_User#Method_2|Method 2]] is best for sharing multiple devices at once. | |
| − | |||
| − | == | + | ==Method 1== |
| − | 1. | + | 1. On the Home tab of DMSS, tap the 3 dots to the right of the device you wish to share and select Share Device: |
| − | + | [[File:SingleShare1.png|300px]] | |
| − | + | 2. From here, you can decide if you want to share specific camera channels, or the whole device: | |
| − | + | [[File:SingleShare2.png|300px]] | |
| − | + | 2.1.a. If you chose to share specific channels, you will be provided a list of video channels on the host device. Select the channels you want to share, and press OK: | |
| − | + | [[File:SingleShare3a1.png|300px]] | |
| − | |||
| − | |||
| − | + | 2.1.b. You will be prompted to select what sort of permissions the user will have via DMSS. Play Video is required (provides Live View camera access), but the others are optional. Once you've made your selections, press Save: | |
| − | + | [[File:SingleSharePerms.png|300px]] | |
| − | + | 2.1.c. From here, enter the email address of the user you are trying to share your device to. You can also modify the channel selections and permissions here if you wish to make changes before sharing. | |
| − | + | Of note, you can also tap the QR button to the right of the email field to easily scan another users QR ID if they are with you, or have sent you their QR. See the QR section for more details at the [[DMSS/Share_Device_with_Another_User#Viewing_and_Scanning_QR_ID.27s|bottom of this guide]]: | |
| − | [[File: | + | [[File:SingleShare3a2.png|300px]] |
| + | |||
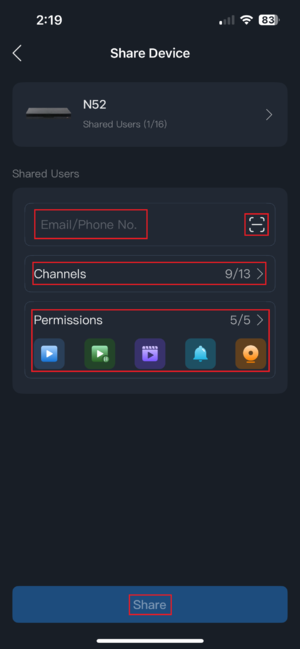
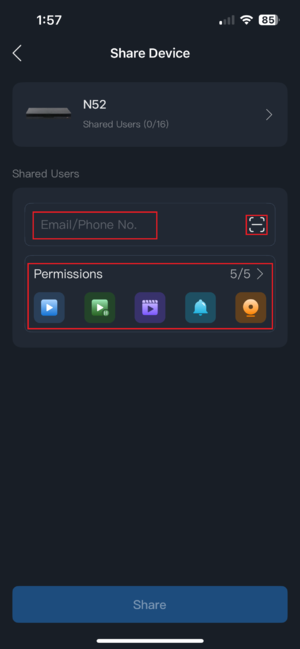
| + | 2.2.a. If you chose to share the whole device enter the email address you wish to share to, or the QR scanner icon to scan the users QR ID. Select the permissions section to modify permissions for the user as seen in 2.1.b, and press Share when you are finished: | ||
| + | |||
| + | [[File:SingleShare3b1.png|300px]] | ||
| + | |||
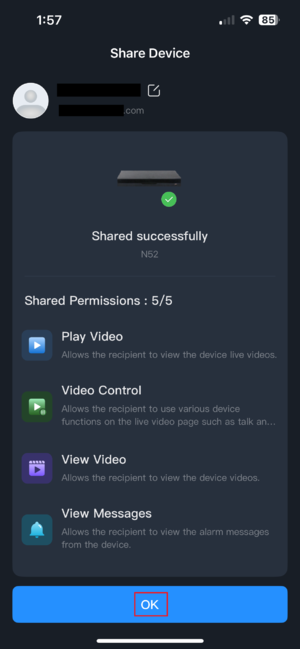
| + | 3. Once completed, you will receive confirmation that the device was shared as well as the permissions provided to the user. Tap OK to complete the process. | ||
| + | |||
| + | [[File:SingleShare4.png|300px]] | ||
| + | |||
| + | ==Method 2== | ||
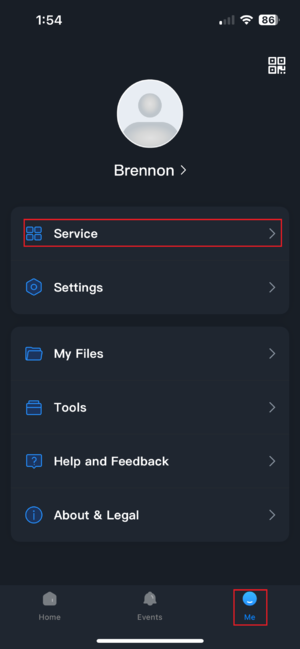
| + | 1. Select the Me tab at the bottom right of the app, and select Service: | ||
| + | |||
| + | [[File:Share1.png|300px]] | ||
| + | |||
| + | 2. Select Share Devices: | ||
| + | |||
| + | [[File:Share2.png|300px]] | ||
| + | |||
| + | 3. Select the devices you wish to share. If a device is not listed here, it means it is not added as an account bound device, you are not the device owner (it was shared to you), or it does not support device sharing: | ||
| + | |||
| + | [[File:Share3.png|300px]] | ||
| + | |||
| + | 4. Enter the email address for the user you wish to share the device(s) to, or select the QR scanner to scan their QR ID ([[DMSS/Share_Device_with_Another_User#Viewing_and_Scanning_QR_ID.27s|more information below]]). You can also tap the device(s) individually to modify permissions for each one independently. Once the email is entered and permissions are set, press Share: | ||
| + | |||
| + | [[File:SharePerms.png|300px]] | ||
| + | |||
| + | [[File:Share4.png|300px]] | ||
| + | |||
| + | 5. You will be prompted to confirm that you are sharing the device. Press OK to do so: | ||
| + | |||
| + | [[File:Share5.png|300px]] | ||
| + | |||
| + | 6. You will receive confirmation that it has been shared. Press OK to complete the process: | ||
| + | |||
| + | [[File:Share6.png|300px]] | ||
| + | |||
| + | ==Viewing and Scanning QR ID's== | ||
| + | |||
| + | 1. To view or save your personal QR ID, start by selecting the Me tab at the bottom right, and then tap the QR icon in the top right: | ||
| + | |||
| + | [[File:ShareQR1.png|300px]] | ||
| + | |||
| + | 2. Either stay on this screen for owners to scan your QR, or you can also select Save To Album to save the QR as an image to your phone. You can email, SMS, or send it to them through whatever means you would normally share an image: | ||
| + | |||
| + | [[File:ShareQR2.png|300px]] | ||
| + | |||
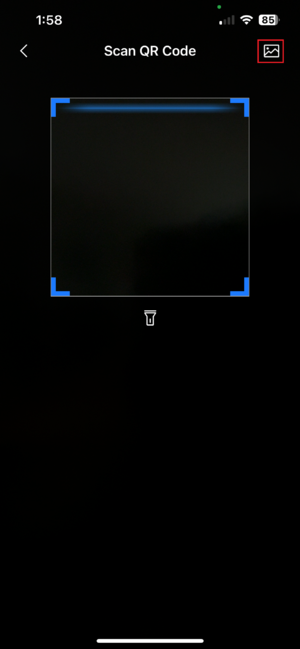
| + | 3. When sharing a device, if you chose to scan a QR ID instead of entering the email, scan the QR from the persons phone, or tap the Image icon in the top right to select a saved QR from your phones photo library: | ||
| + | |||
| + | [[File:ShareQR3.png|300px]] | ||
Latest revision as of 19:15, 4 August 2025
Contents
Description
This article will show you how to share a Dahua device from one DMSS account to another, using 2 different methods. It will also show how a user can provide a QR code so that an owner can easily share a device to them.
Prerequisites
- Dahua Account
- Dahua Device added to the Dahua Account
There are 2 methods you can use to share a device in DMSS. Both methods provide the same result, but Method 1 is best for sharing a single device, while Method 2 is best for sharing multiple devices at once.
Method 1
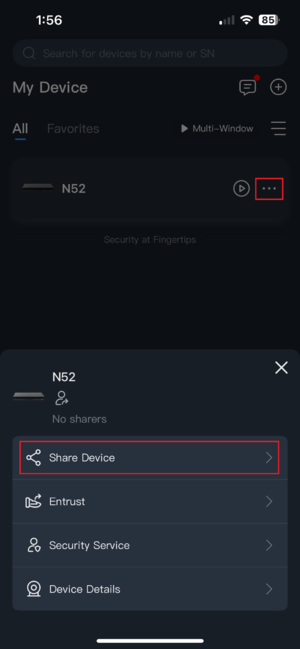
1. On the Home tab of DMSS, tap the 3 dots to the right of the device you wish to share and select Share Device:
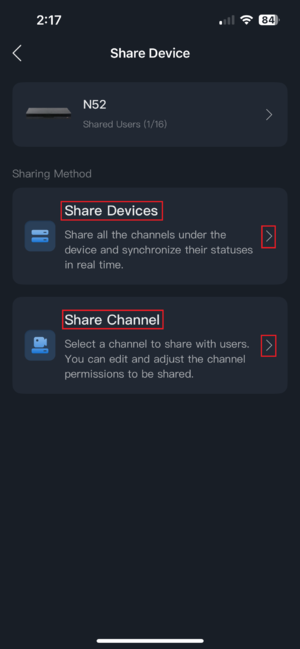
2. From here, you can decide if you want to share specific camera channels, or the whole device:
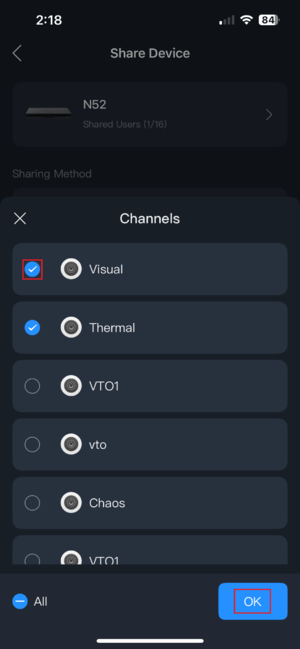
2.1.a. If you chose to share specific channels, you will be provided a list of video channels on the host device. Select the channels you want to share, and press OK:
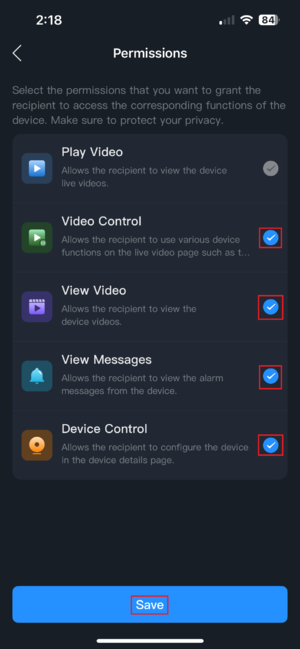
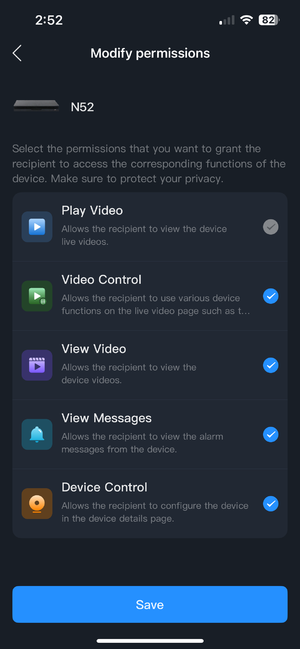
2.1.b. You will be prompted to select what sort of permissions the user will have via DMSS. Play Video is required (provides Live View camera access), but the others are optional. Once you've made your selections, press Save:
2.1.c. From here, enter the email address of the user you are trying to share your device to. You can also modify the channel selections and permissions here if you wish to make changes before sharing.
Of note, you can also tap the QR button to the right of the email field to easily scan another users QR ID if they are with you, or have sent you their QR. See the QR section for more details at the bottom of this guide:
2.2.a. If you chose to share the whole device enter the email address you wish to share to, or the QR scanner icon to scan the users QR ID. Select the permissions section to modify permissions for the user as seen in 2.1.b, and press Share when you are finished:
3. Once completed, you will receive confirmation that the device was shared as well as the permissions provided to the user. Tap OK to complete the process.
Method 2
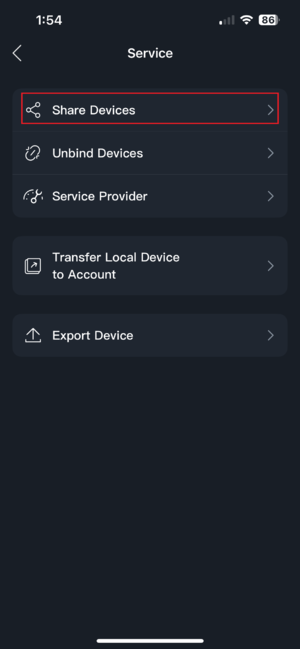
1. Select the Me tab at the bottom right of the app, and select Service:
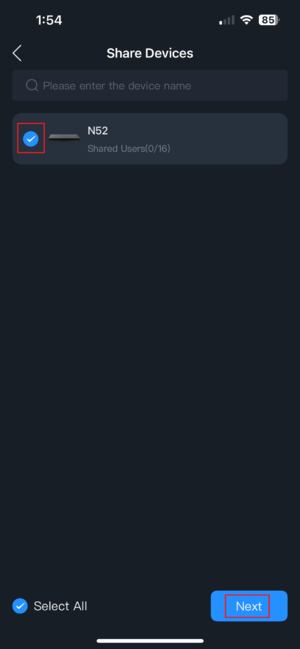
2. Select Share Devices:
3. Select the devices you wish to share. If a device is not listed here, it means it is not added as an account bound device, you are not the device owner (it was shared to you), or it does not support device sharing:
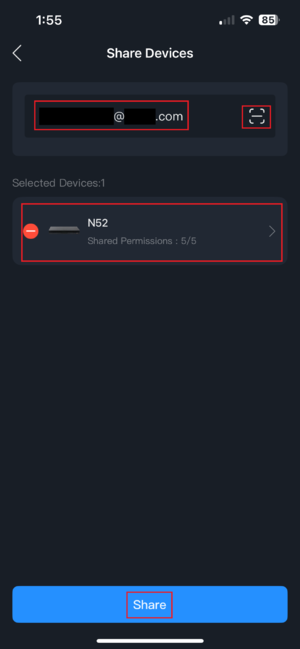
4. Enter the email address for the user you wish to share the device(s) to, or select the QR scanner to scan their QR ID (more information below). You can also tap the device(s) individually to modify permissions for each one independently. Once the email is entered and permissions are set, press Share:
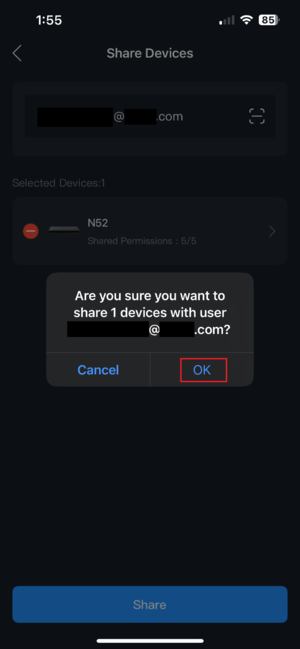
5. You will be prompted to confirm that you are sharing the device. Press OK to do so:
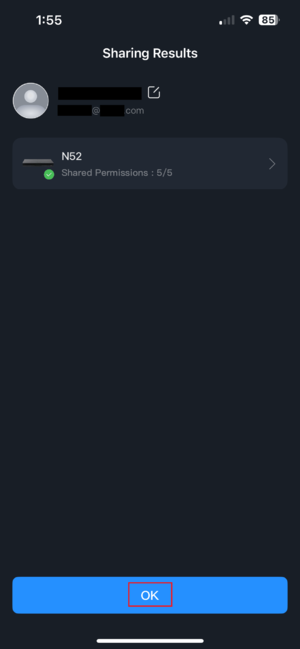
6. You will receive confirmation that it has been shared. Press OK to complete the process:
Viewing and Scanning QR ID's
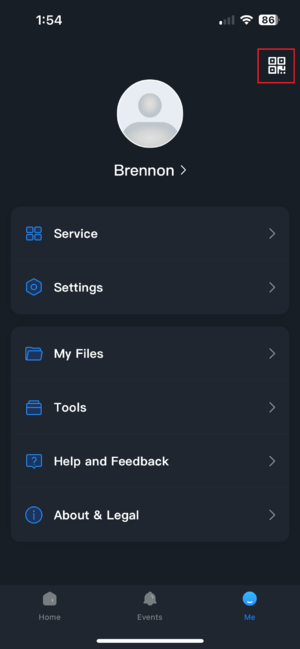
1. To view or save your personal QR ID, start by selecting the Me tab at the bottom right, and then tap the QR icon in the top right:
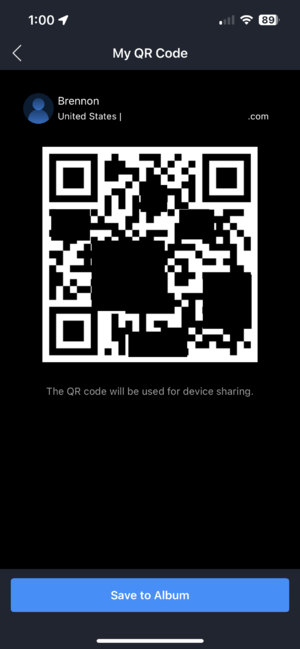
2. Either stay on this screen for owners to scan your QR, or you can also select Save To Album to save the QR as an image to your phone. You can email, SMS, or send it to them through whatever means you would normally share an image:
3. When sharing a device, if you chose to scan a QR ID instead of entering the email, scan the QR from the persons phone, or tap the Image icon in the top right to select a saved QR from your phones photo library:
