Difference between revisions of "Thermal/Temperature Monitoring/Physical Setup"
| Line 42: | Line 42: | ||
File:Temperature_Monitoring_-_Black_body_temp.jpg|Allow the device to warm up to 35.0 C | File:Temperature_Monitoring_-_Black_body_temp.jpg|Allow the device to warm up to 35.0 C | ||
</gallery> | </gallery> | ||
| + | |||
| + | Physical setup is now complete you can continue with setup and programming: | ||
| + | |||
| + | If you're using an NVR, follow the [[Thermal/Temperature Monitoring/NVR Setup|steps to set up Thermal Monitoring solution with NVR]] | ||
| + | |||
| + | If you're using a stand alone Thermal Camera, follow the [[Thermal/Temperature Monitoring/Stand Alone Camera Setup|steps to set up Thermal Monitoring solution with stand alone Thermal camera]] | ||
Revision as of 22:03, 23 April 2020
Contents
Temperature Monitoring Solution Physical Setup
Description
This guide will show the proper physical arrangement/setup of the devices for the Temperature Monitoring Solution
Video Instructions
Step by Step Instructions
Mounting Adapter Plates
The mounting brackets/plates must be installed to both the camera and black body device

RQW026-00 Brackets
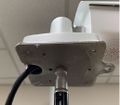
Black body bracket installation
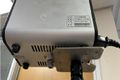
Thermal camera bracket installation


To attach the tripod:
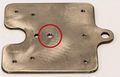
Use the center hole to screw into tripod

Tripod installed


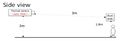
Suggested Physical Layout

Side view diagram
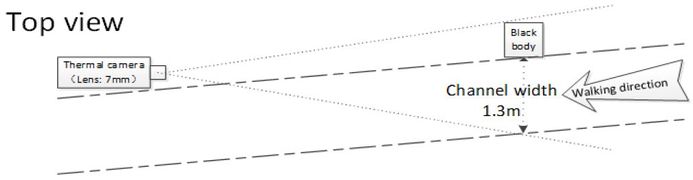
Top view diagram


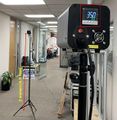
Camera height: 2m (6.56 ft)

Black body height: 1.8m (5.9 ft)
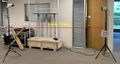
Minimum distance between both: 3m (9 ft)
Side view diagram

Top view diagram


JQ-D70Z Black body Setup
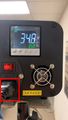
Plug in the power and turn on

Allow the device to warm up to 35.0 C


Physical setup is now complete you can continue with setup and programming:
If you're using an NVR, follow the steps to set up Thermal Monitoring solution with NVR
If you're using a stand alone Thermal Camera, follow the steps to set up Thermal Monitoring solution with stand alone Thermal camera